


At times we are compensated for the links you click at no cost to you. Learn more about why you should trust our reviews and view our disclosure page.
As the old saying goes, one man’s junk is another man’s treasure. Once you get a new mattress, you can disassemble the old one and let your creativity loose. This step-by-step tutorial is going to teach you all about how to upcycle mattress springs – what tools you need, how to get coils out of the mattress, and finally, you’ll get lots of ideas on how to repurpose the old bed springs into something pretty and useful.
How to Upcycle Mattress Springs: Step-by-Step Guide
This is the outline of what you need to do:
- Gather the correct tools and materials
- Disassemble mattress springs
- Prepare the springs for upcycling
- Assemble the final upcycled product
The second step takes up the most time and space, but it’s worth it. Actually, some designs and projects don’t require you to take the coil springs apart – be sure to check out all ideas below before you finally decide on what to do.
Just one more thing before we start – if you fall in love with the ideas you’re about to see but don’t have an old mattress, don’t worry! Many people are selling parts of their disassembled old mattresses. It’s really not hard to find old springs from innerspring mattresses or hybrid mattresses on websites that sell used stuff. Also, it should go without saying that this guide obviously won’t work if you have a mattress without springs.
Step 1: Gather the correct tools and materials
You first need tools to open up and disassemble the mattress. These are:
- a box cutter
- scissors
- a wire cutter
- a drill
Scissors may or may not come in handy when removing soft materials, but it’s nevertheless good to have them with you.
Whether or not you’ll need a wire cutter depends on the type of spring system in your mattress and the project you’re planning to make. If you have pocketed coils in the mattress, you don’t need a wire cutter because they are already separated – you only need to cut the pockets open.
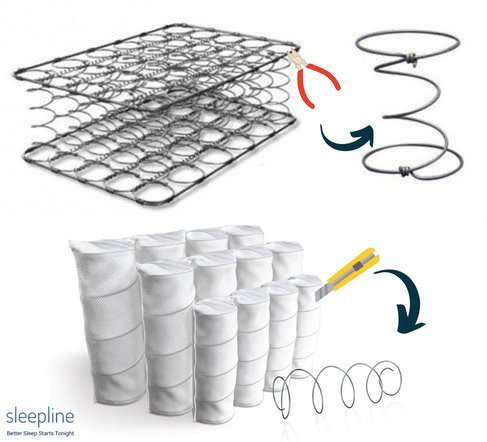
Notice the difference in the coil shapes in the picture above. There are several common types of coils, and we’re showing a bonnel coil (the one with a wider top and bottom) and a pocketed coil – the narrower one. Bonnel coils are better for some projects and pocketed coils for others.
If your bed has continuous coils (rows of very long wires), you won’t be able to repurpose them in a lot of ways, unless you’re super-creative.
Step 2: Disassemble mattress springs
Once you’ve removed the cover and comfort layers, you need to disassemble the springs. As mentioned above, pocketed coils are easy to open up, but the common coils are connected to border rods (outer edge lines) and require more work to be separated.
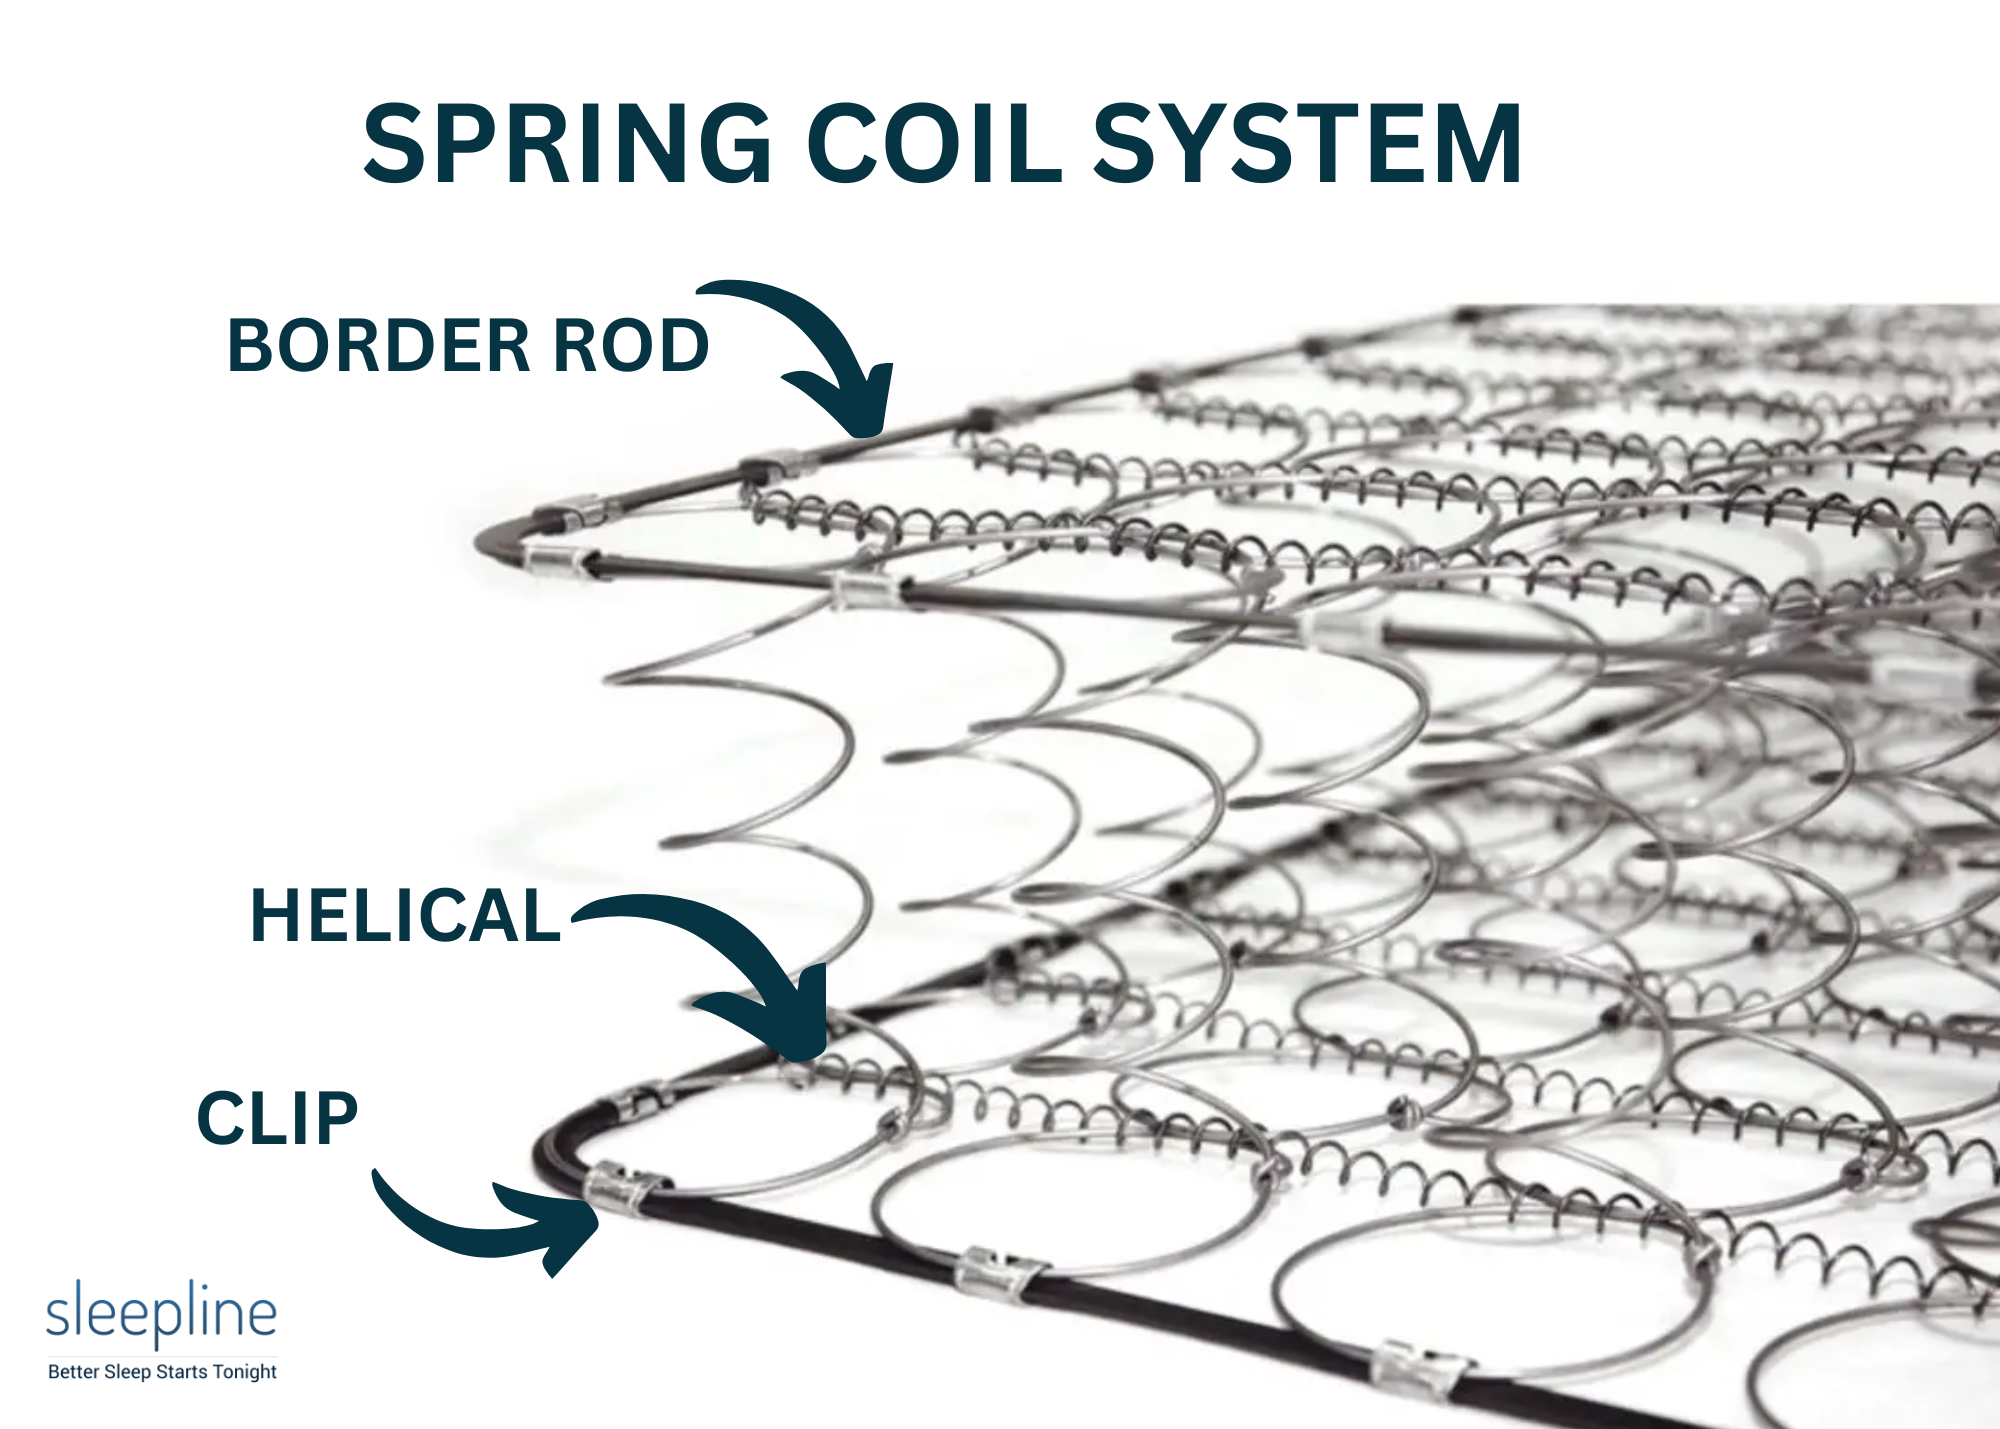
Take a wire cutter and cut around all four corners of the border rods. You need to cut a bit away from the corner itself (red-blue wire cutters in the picture below show where exactly). But don’t try to remove rods just yet.
Then cut the helicals at both ends. Take a drill and place one end of the helical right in the center of the three jaws of the chuck (where you’d normally place a drill bit). Set it to reverse and let the drill do the job. Pull it away from the spring coils as it unscrews. You could use the helicals for various projects.
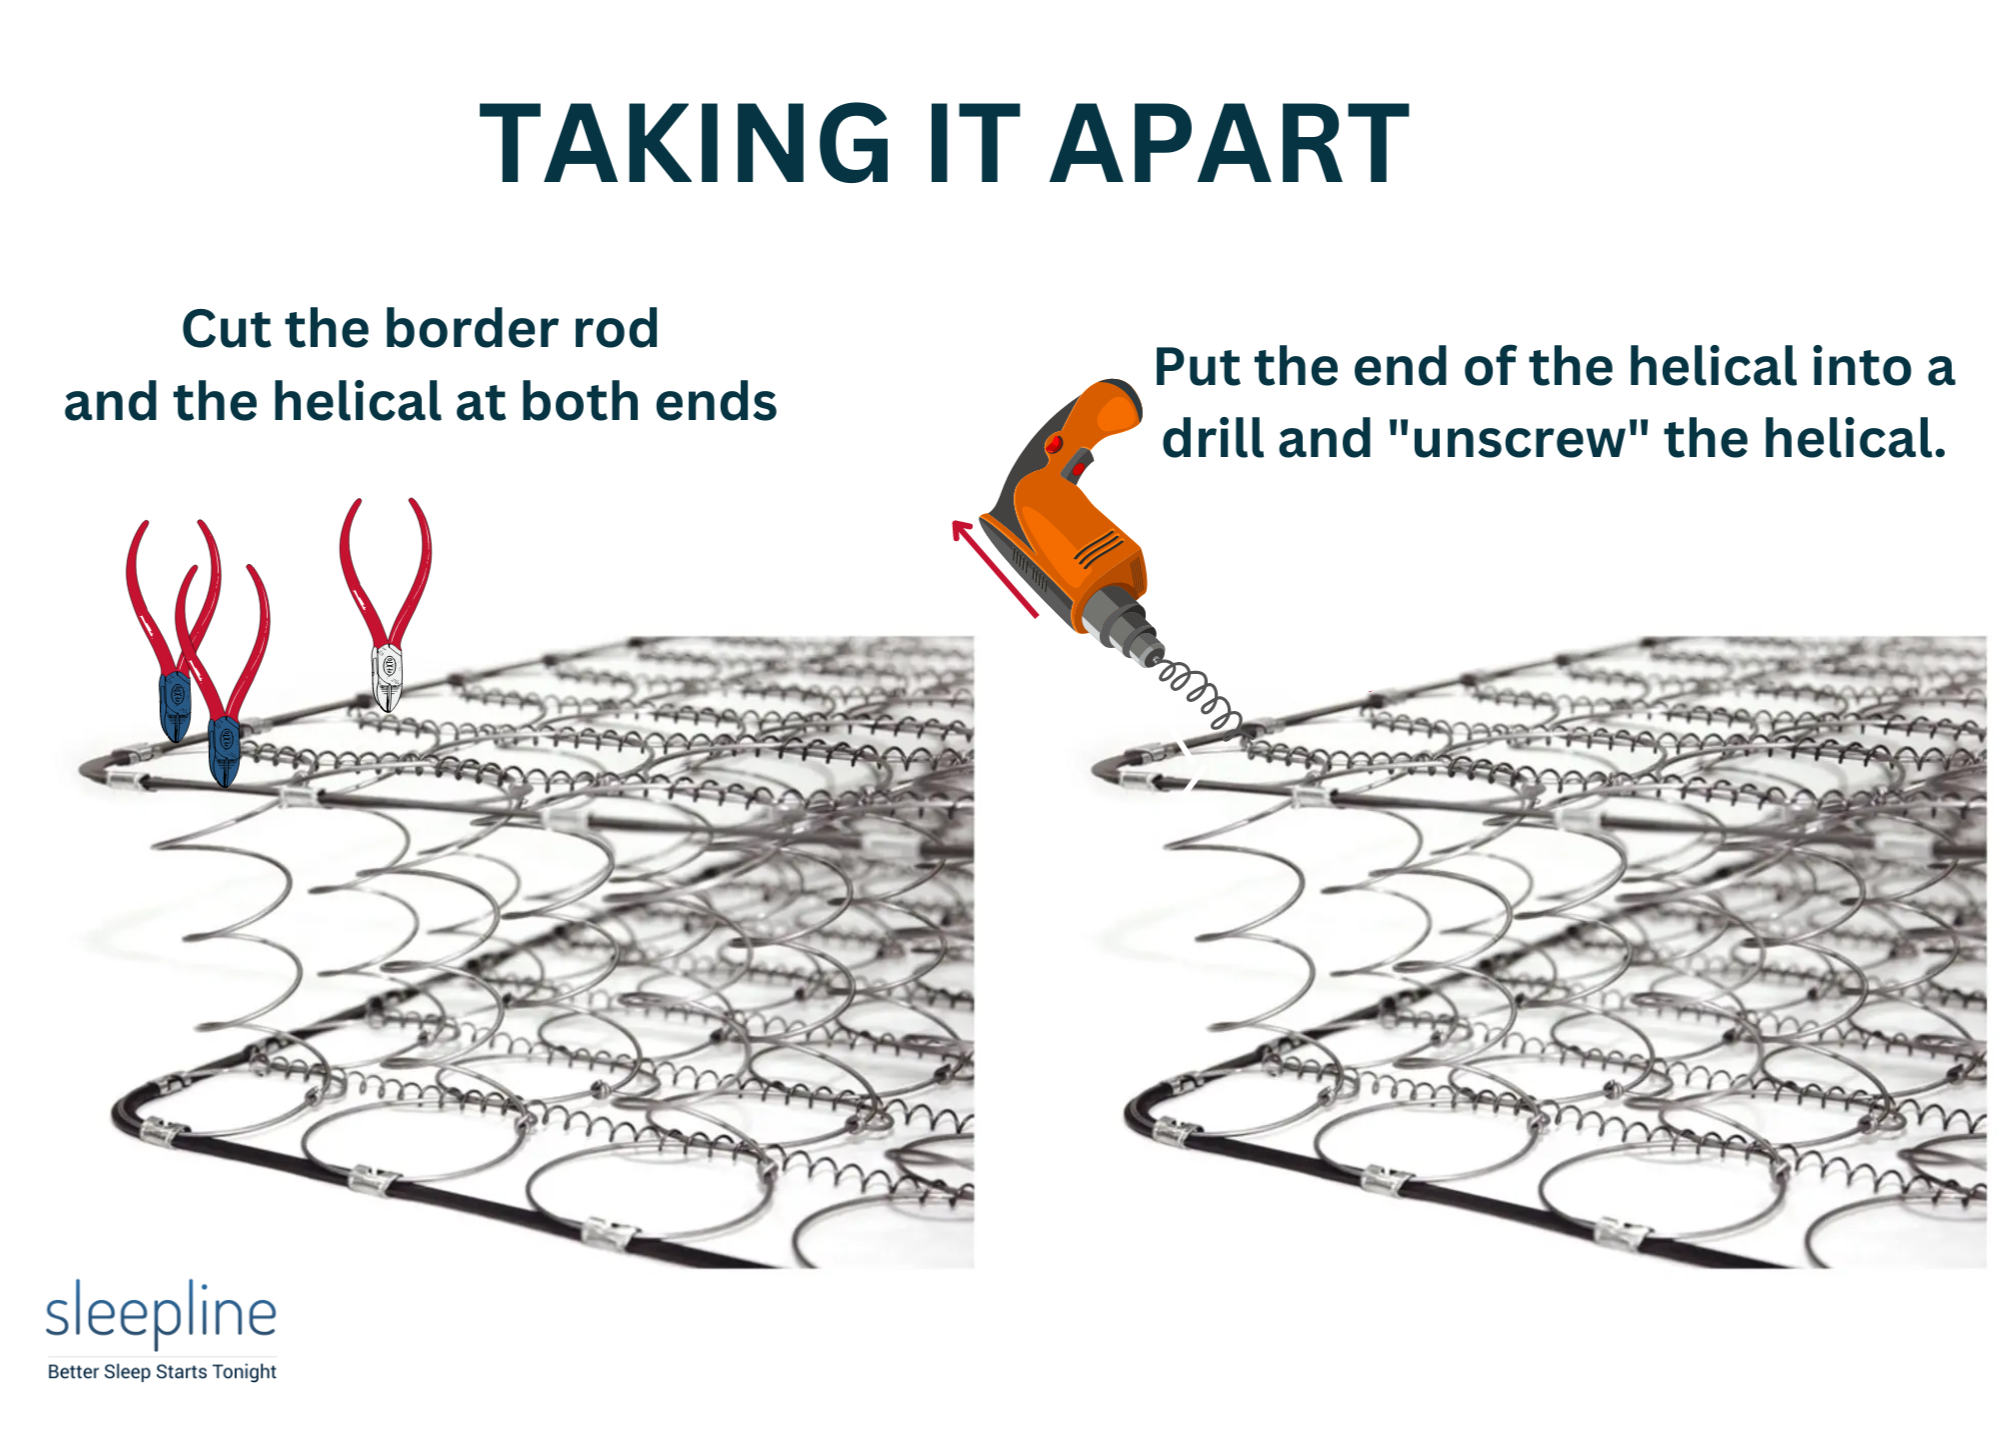
Keep up with the process until you get rid of all helicals on the top side. Then cut each coil right next to the clip. The picture below shows where to cut on the bottom side, but you should first do the process on the upper side.
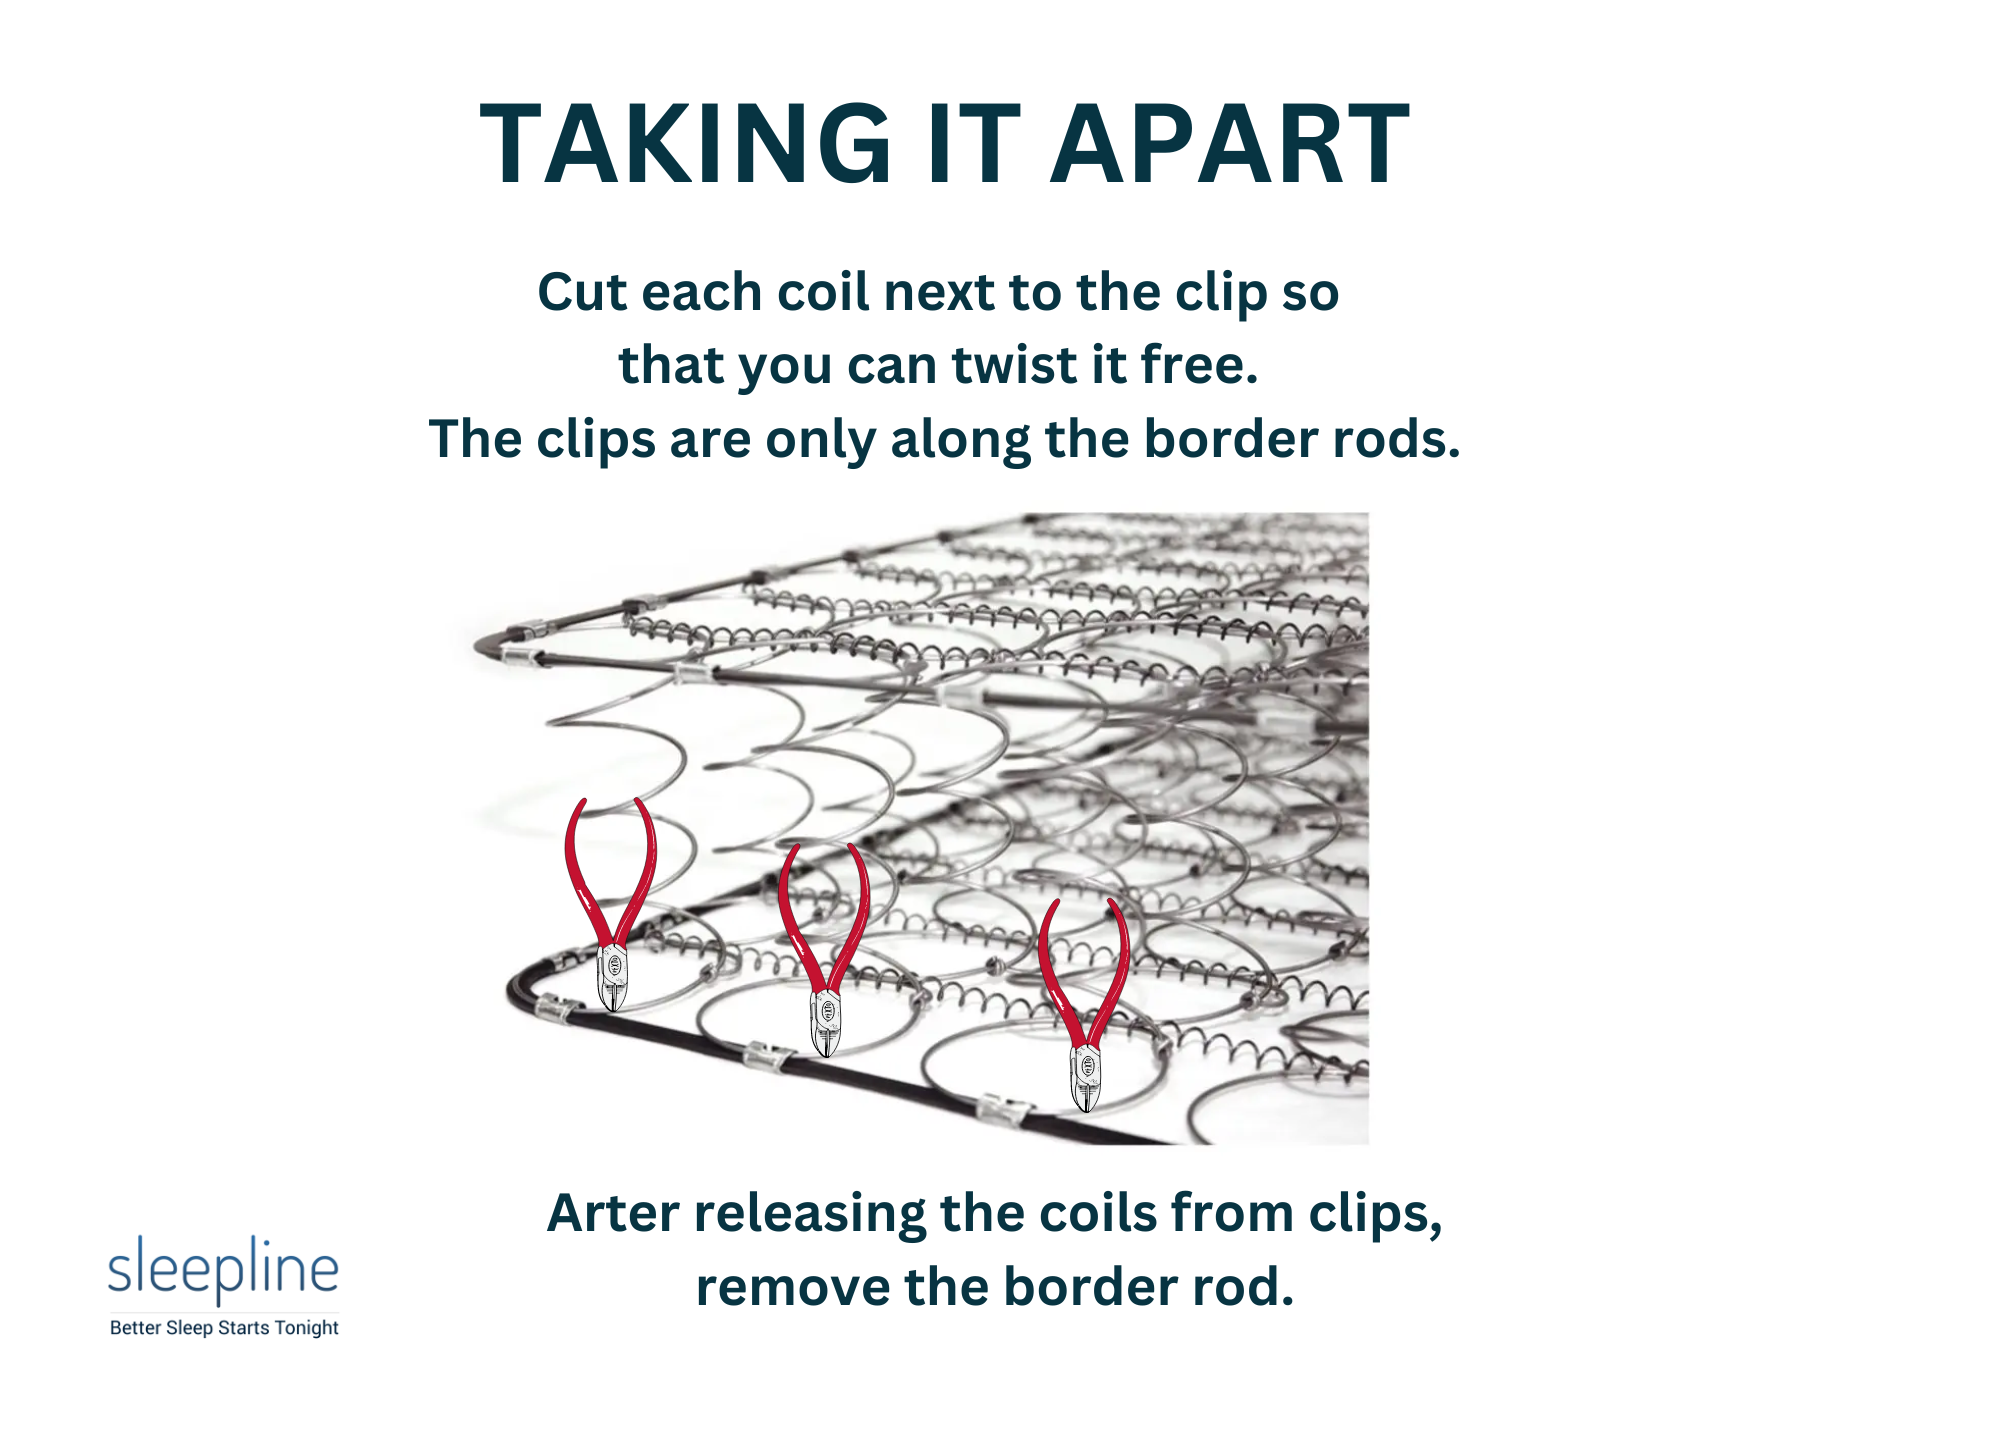
Then twist the coil with your hand to get it free from the clip. Clips keep coils attached to border rods, so that’s the only place in the coil system you’ll find them.
Once this is done, flip the coil springs and repeat. As you remove the last helicals, individual springs will get completely released. Cut the coils close to the clips again and twist them free.
Now you’ll end up with four short rods, four long rods, lots of helicals, and lots of coils!
Step 3: Prepare the springs for upcycling
Take a look at the springs – are they rusty? If yes and you don’t want them so, you can sand them and even spray paint them afterward. Rusty bed springs look good for some projects, while clean and painted ones are better for other.
Depending on the project itself, you may need more preparation, such as cutting off a part of the coil or reshaping/bending its wire.
Step 4: Assemble the final upcycled product
Finally, take all the springs and additional materials and put them together. If your design requires attaching coils together, first place each one on a flat surface and see what they would look like attached. Make any changes and once you’re sure you’ve got the right look, start attaching them. Add any extra decorative elements (like fabric, flowers, a faux nest, etc.) at the very end.
Tools You Need to Upcycle Mattress Springs
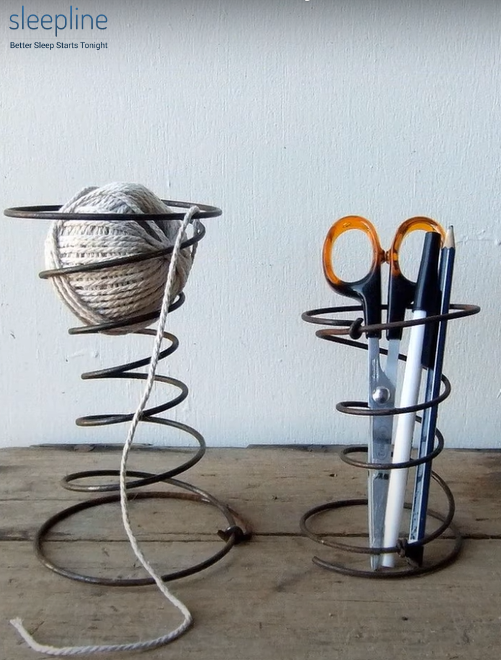
The simplest projects don’t require any tools whatsoever. If you’re using the old bed spring as a candle holder, for a flower display, or as a letter holder for example, just place the spring on the table and put the items of your choice into it.
Otherwise, more complex ideas might require:
- a wire cutter
- a wire bender
- pliers
- a hammer and nails
- a drill and screws
- a staple gun
- wood boards
- glue and/or festive decorating materials
- fabric
- zip ties or something to use instead of zip ties (metal wire, thread)
- chains (for really big projects)
Take a look at ideas below and decide which exact materials you’ll need from the list.
What You Can Make with Old Mattress Springs
Outdoor wreath
You can make an outdoor wreath to decorate your patio, backyard, or gate. These wreaths will be exposed to weather elements, so it’s probably best to not even try painting the coils but to just let them rust.
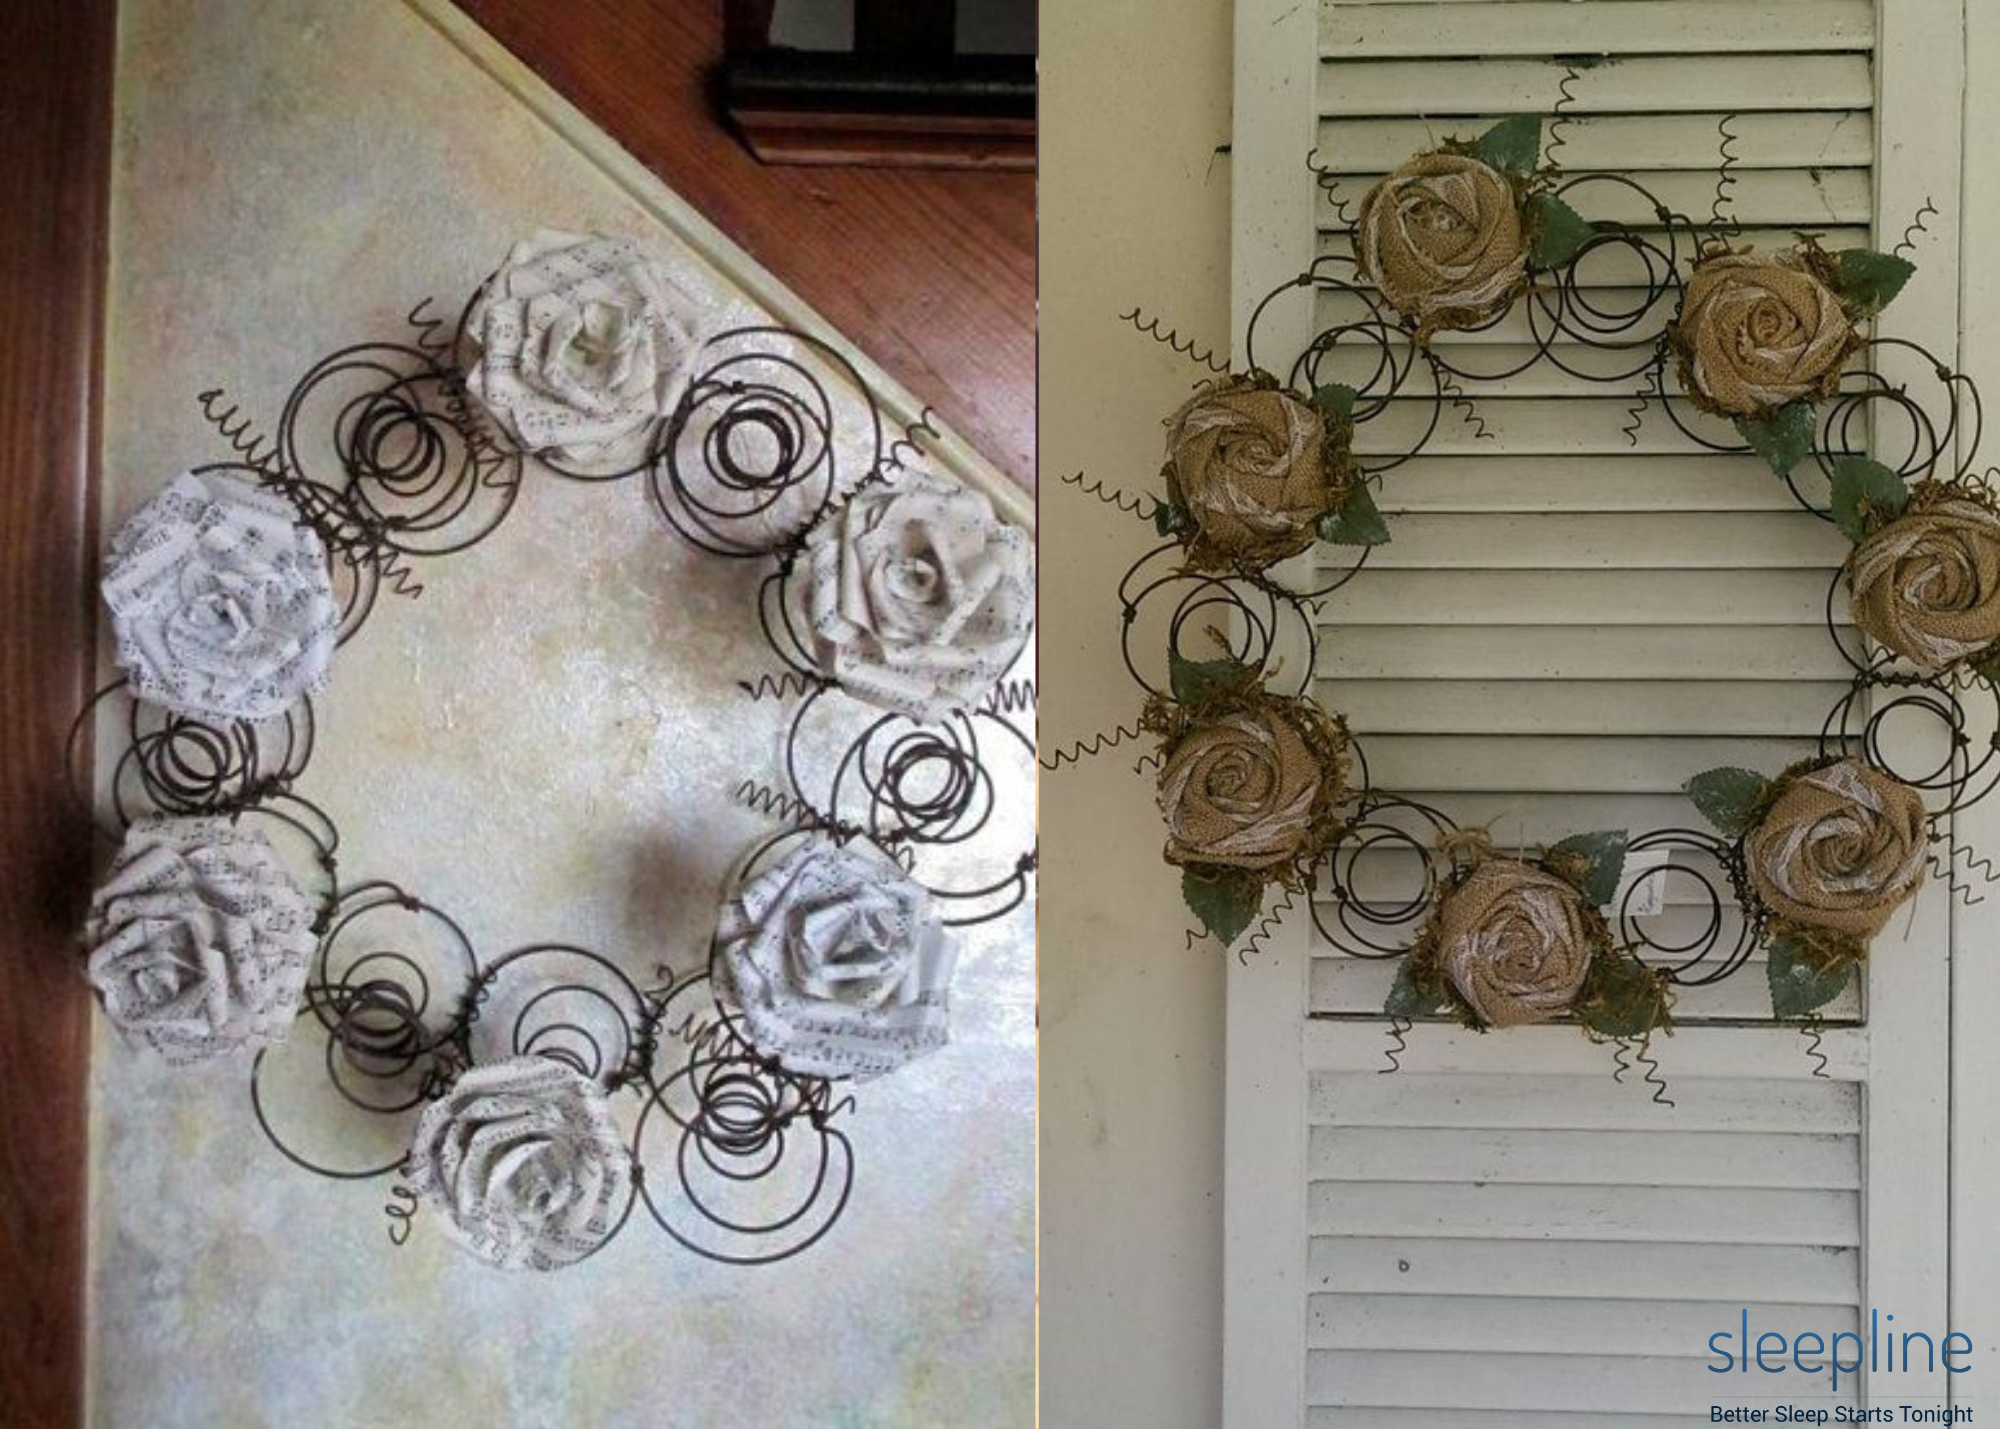
Think of designs that would match the rusty color – your bed spring wreath can be decorated with fabric rolled to mimic roses and helicals to mimic petioles or another part of a plant. To give it more color, you can attach some fake green leaves.
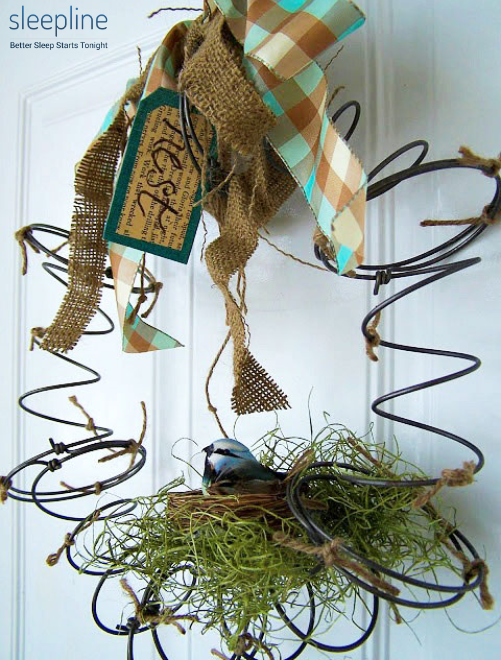
If you’re more into a simpler design, you can attach old bed springs at their tops and bottoms using a thread, then add some grass or a store-bought nest and place an artificial bird inside. It will look cuter if you add a bow on the top.
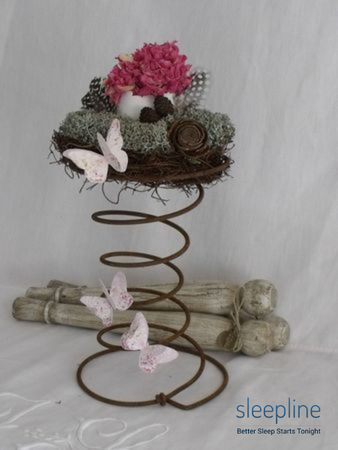
Decorative sculpture
You can make seasonal decorations – below are some Christmas trees and a pine cone covered in snow. Alternatively, to go with October themes, place some short pieces of hay and a small pumpkin on top. For Easter, you could make a small nest and put an egg inside.

The sculpture below isn’t seasonal, but just plain decorative. Some artificial butterflies, a small nest, an egg, feathers, flowers and a little bird on top. Use any colors or themes that match the mood of the room you’re decorating.
Candle holder
This one’s a great idea for candle lovers. Your candle should be inside a glass holder first. Then, depending on the size and type of the glass, you can either put it inside the coil or on the top of it. In the latter case, you’ll have to use superglue or something else to form a strong bond with the glass.
The pictures below show unpainted coils, but imagine a coil candle holder painted white or some pastel color… It could look very stylish!

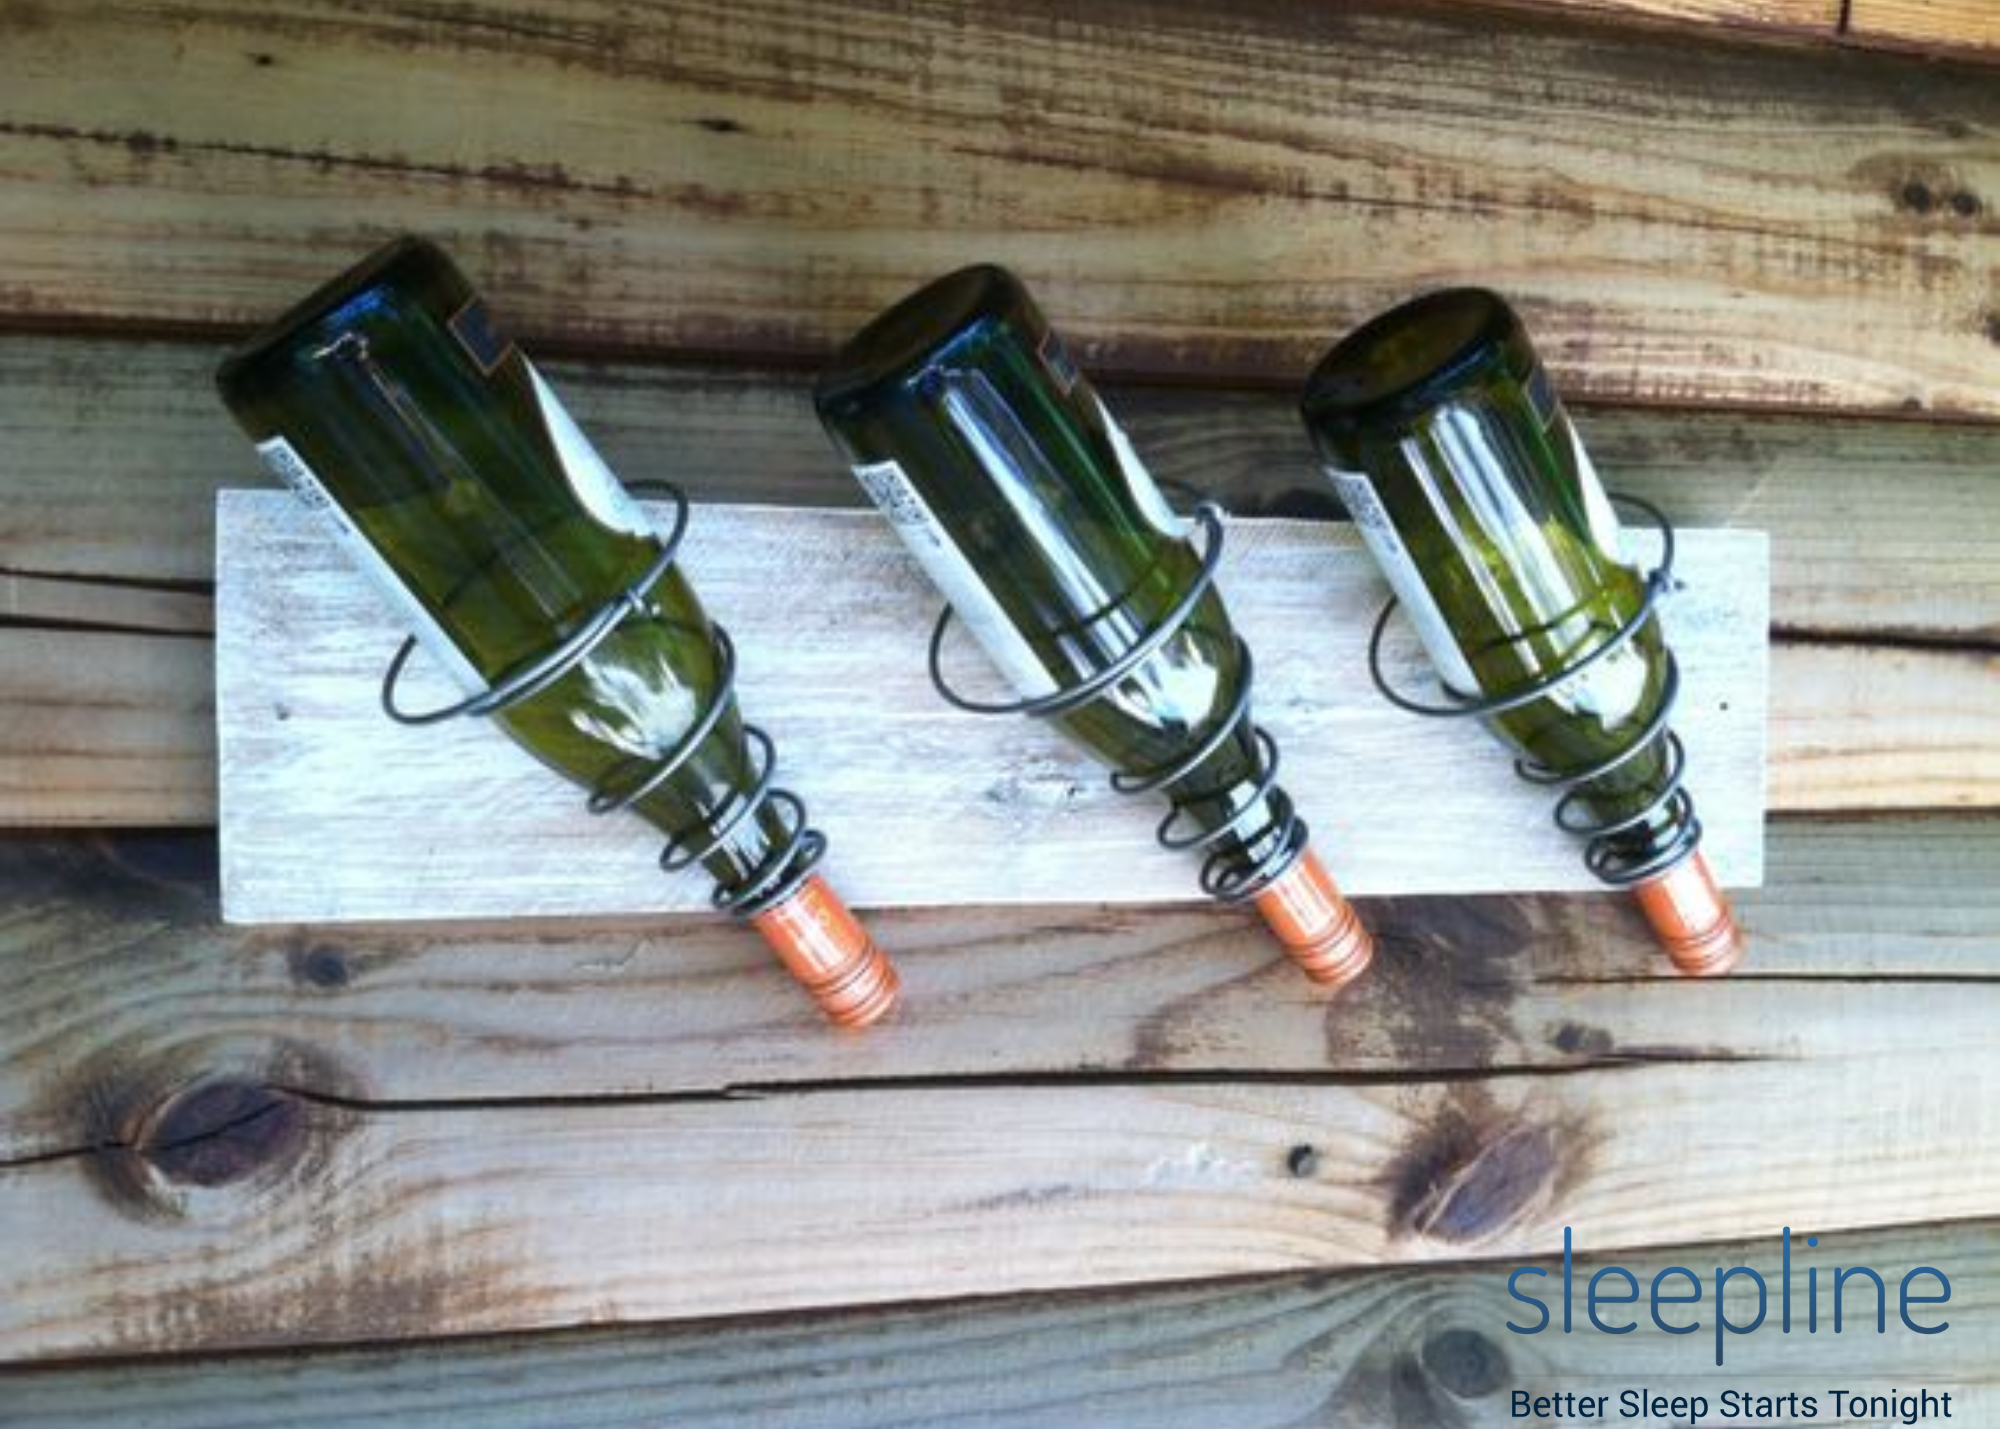
Wine rack
You could use old bed springs to store wine bottles. This craft requires more skill because you need to get the angle right (at about 60 degrees) so that the bottle doesn’t fall over. Also be careful when attaching the coil to the board – it needs to be firm. Use nails or a staple gun to attach springs to the board.
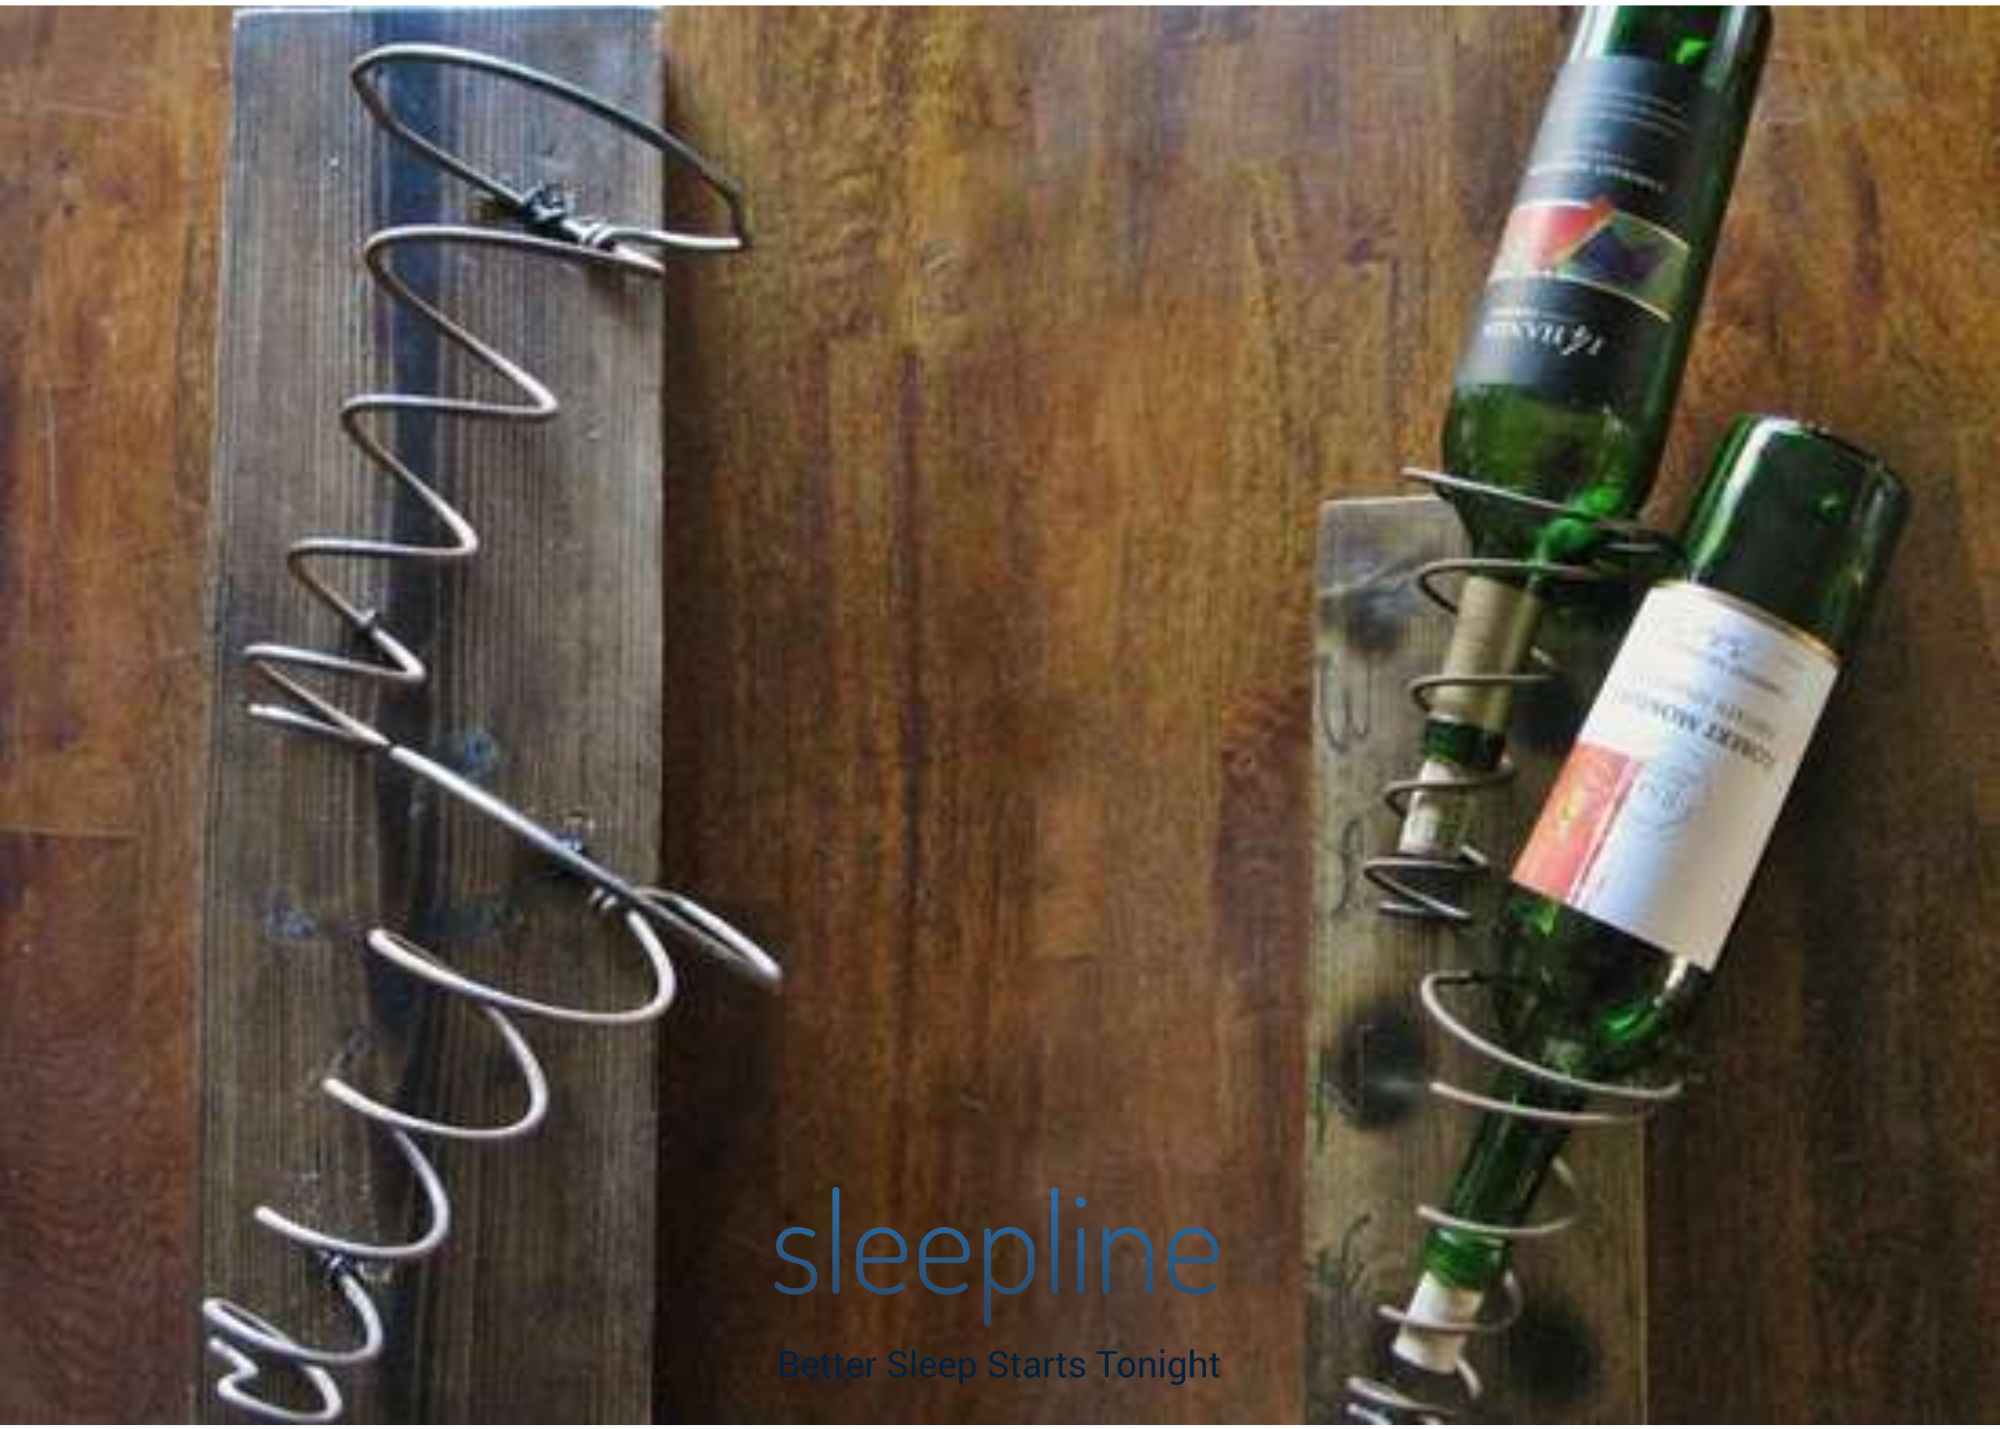
Springs can be placed horizontally or vertically on the board. Getting your design right can really save on your space or make an interesting center piece on the wall. Use sanded springs for a more fancy look and rusty ones for a more rustic look.
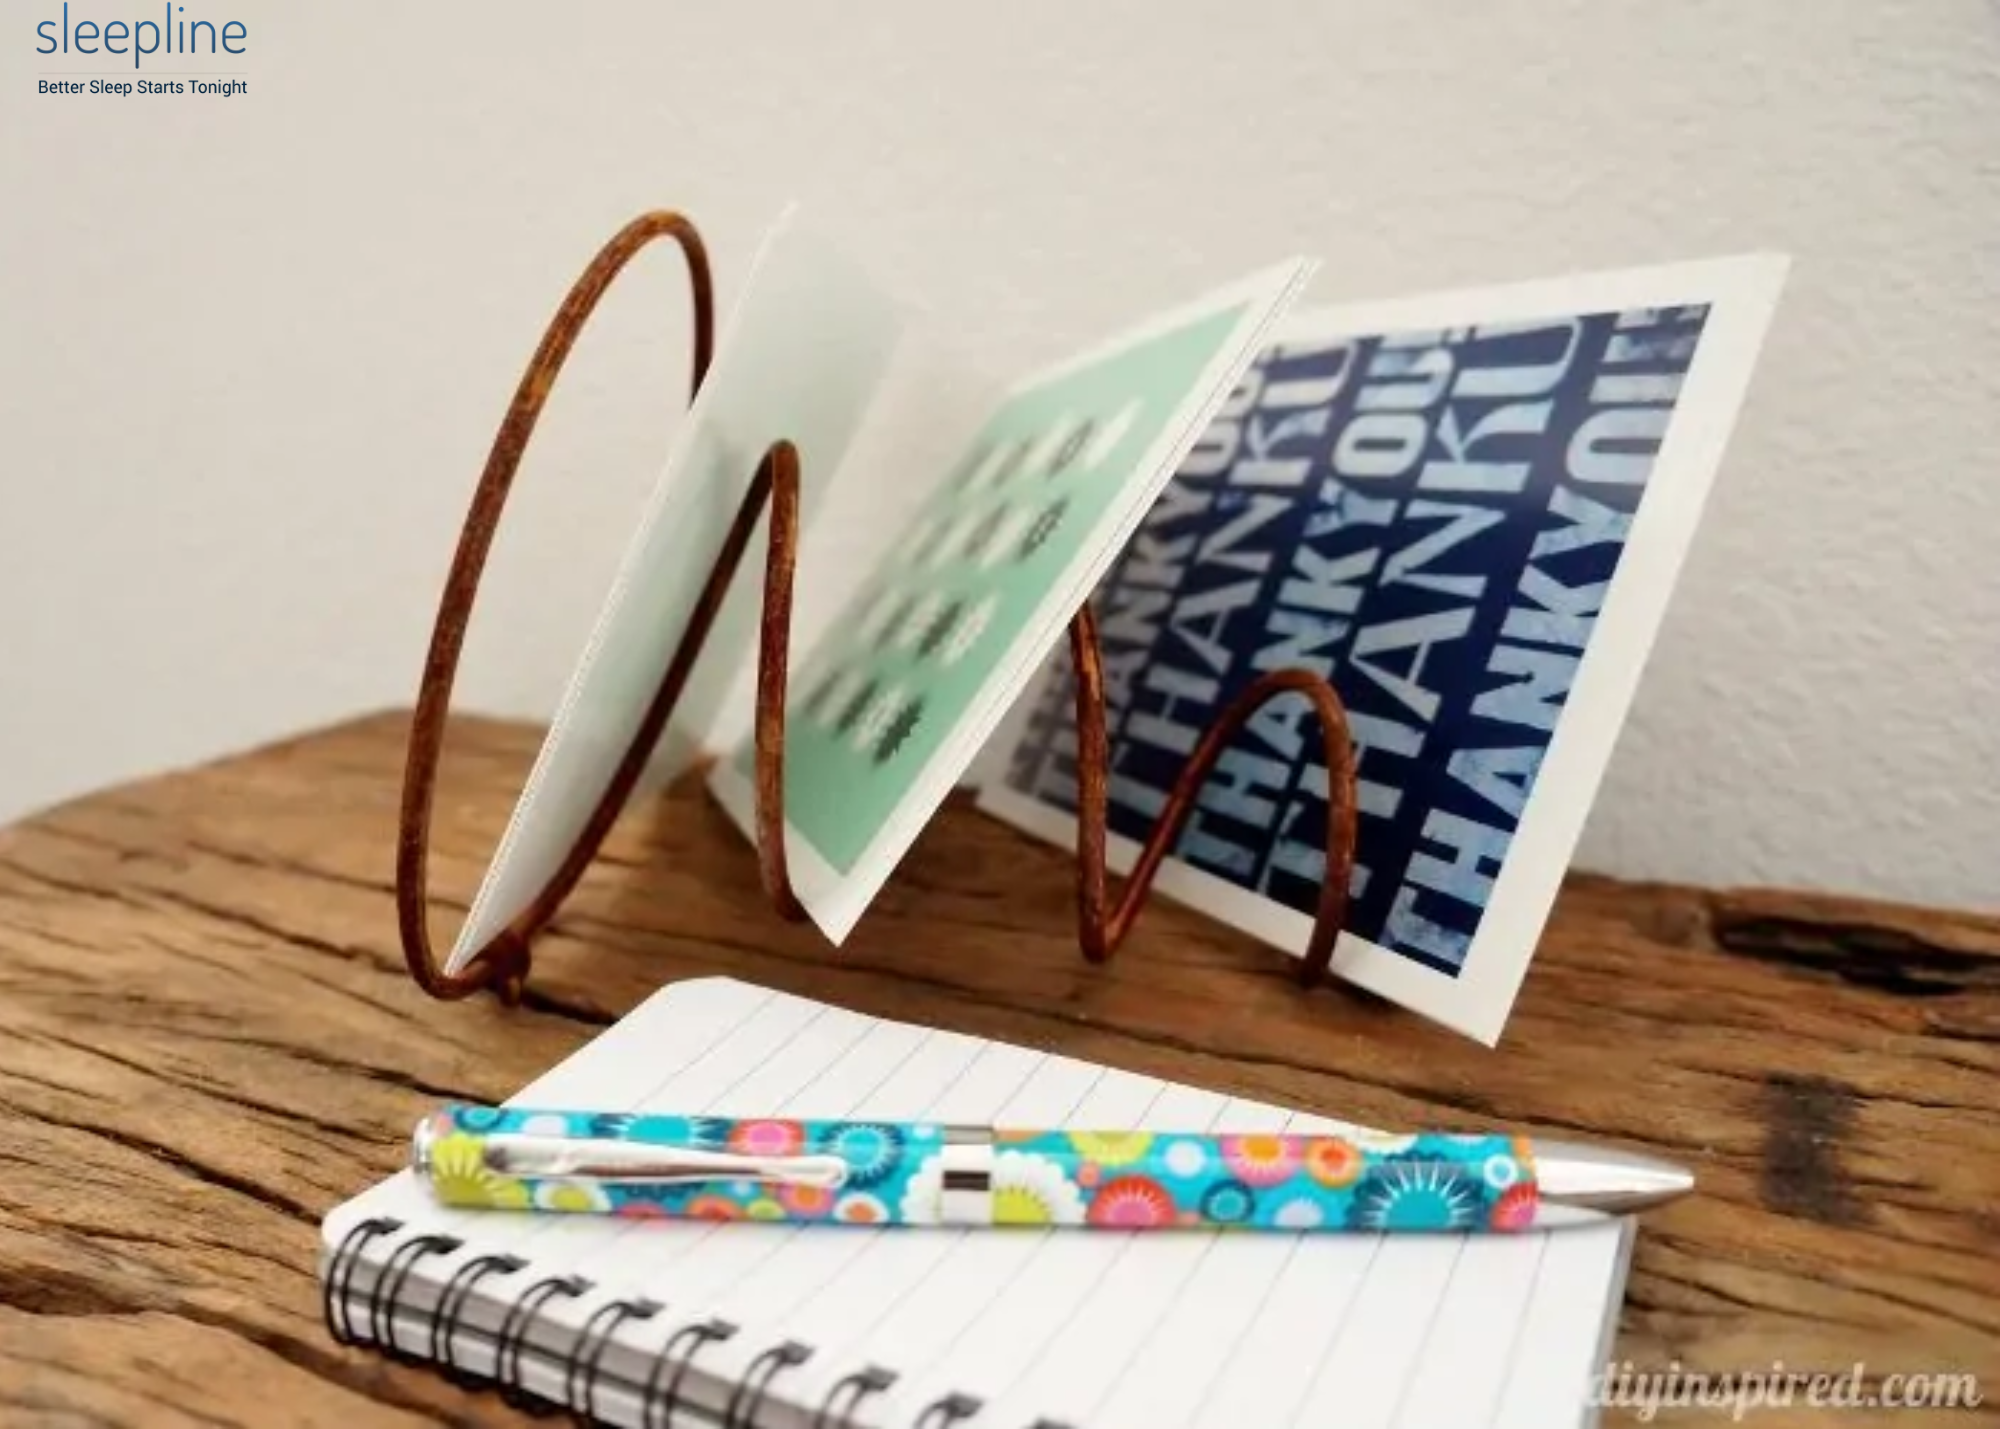
Letter holder
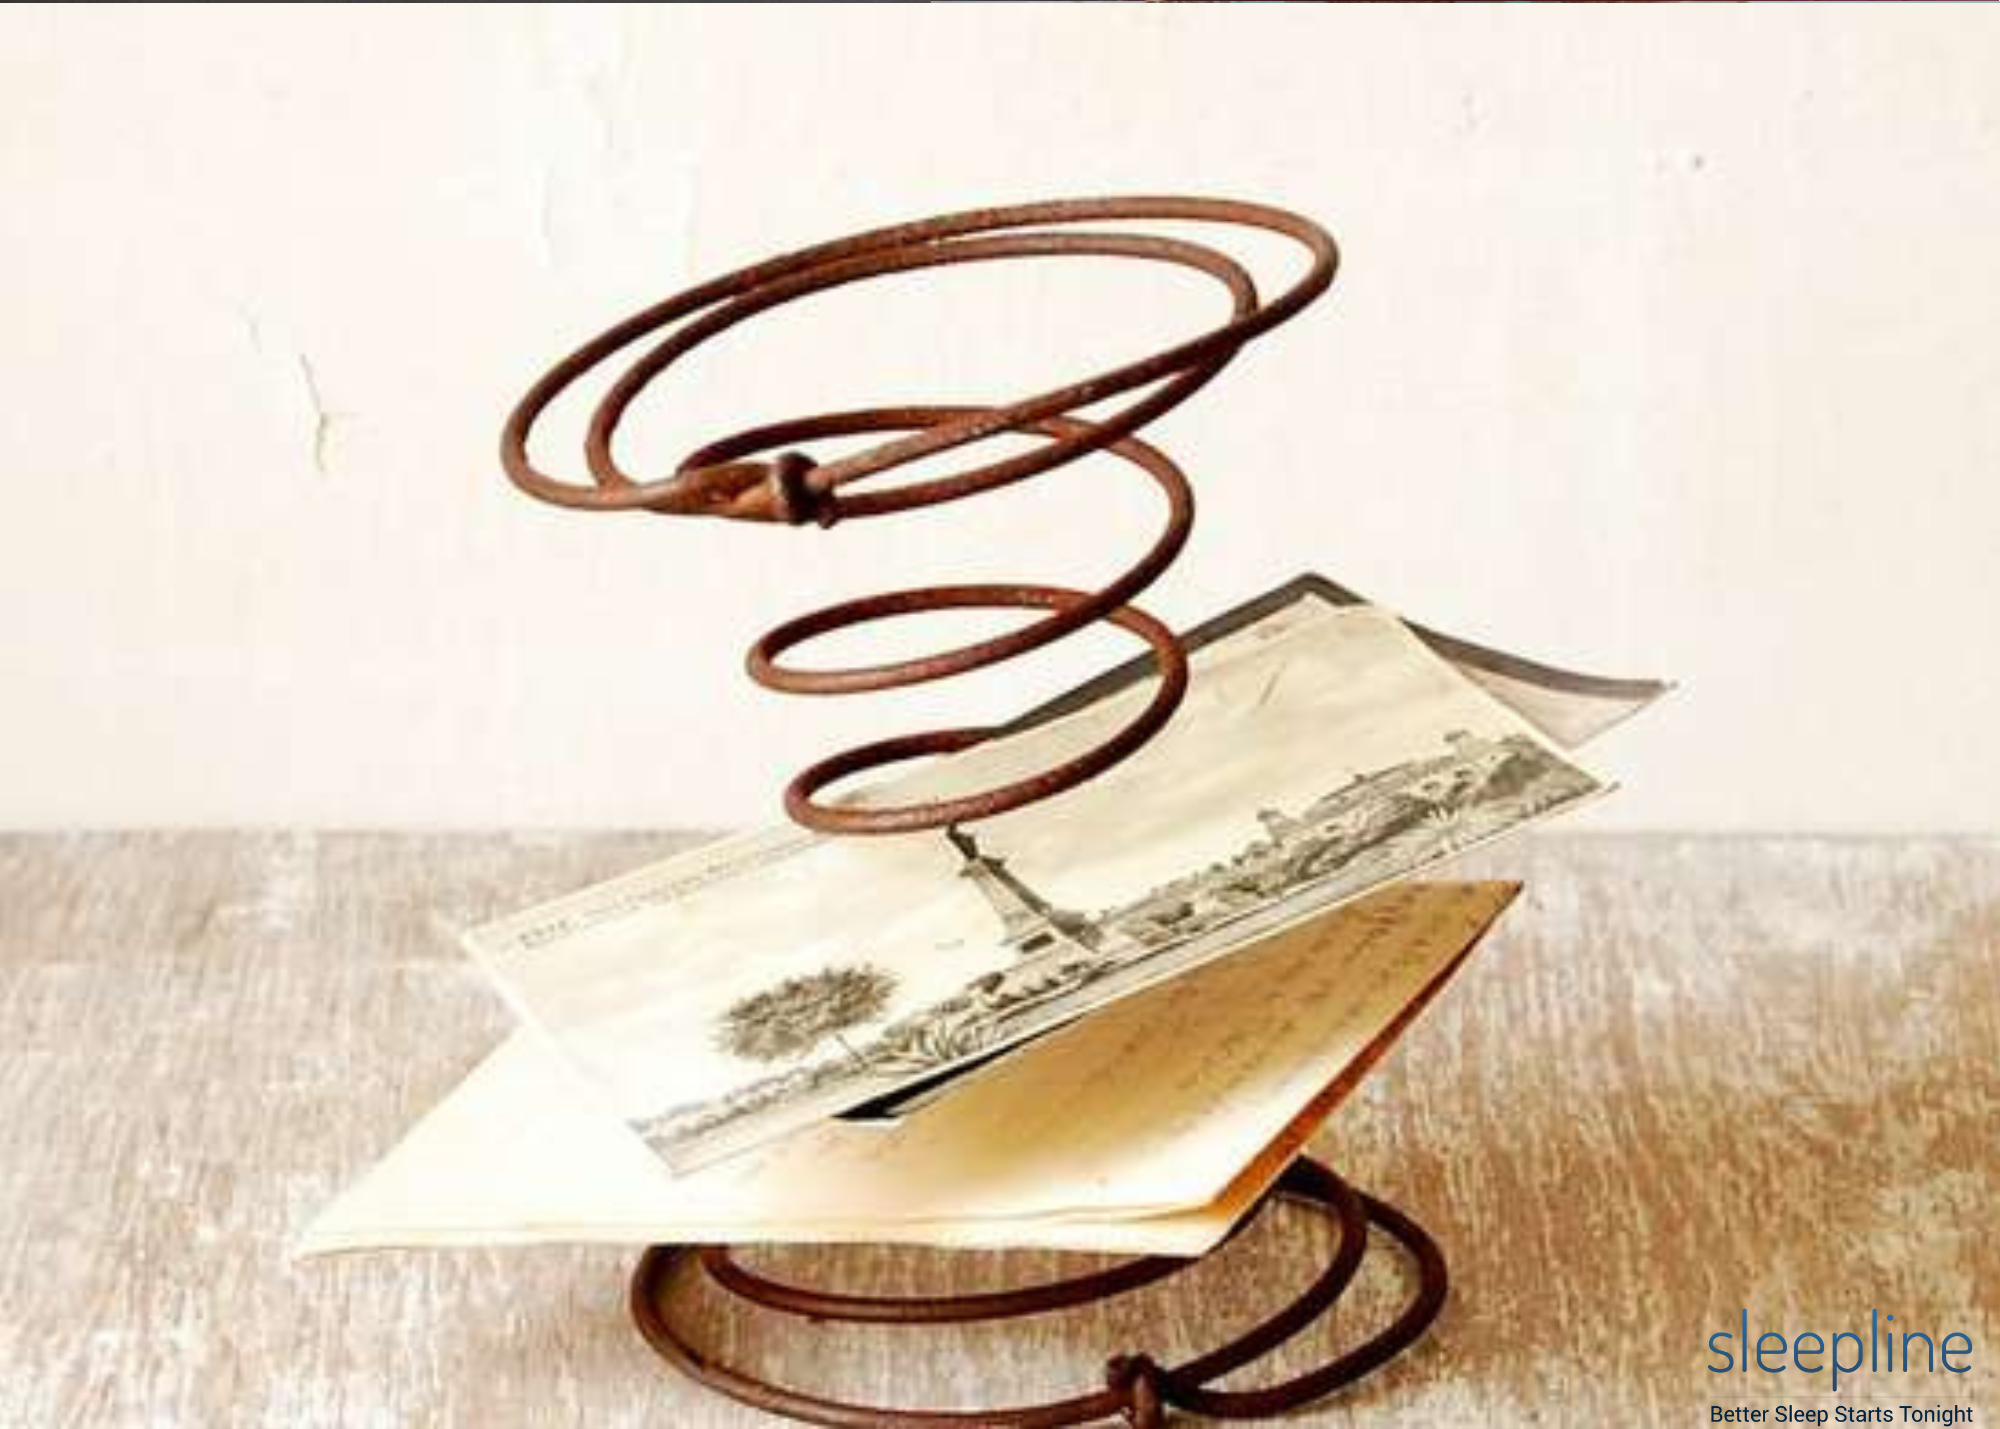
Letters and postcards are rare nowadays; but even if you don’t have any actual letters, it doesn’t have to mean you can’t use old rusty bed springs as letter holders. This can be purely decorative – even something you printed from the internet.
Another idea is to keep birthday cards given by dear people or you could even ask the closest of your friends to write something nice for you so you can always keep their kind words by your side.
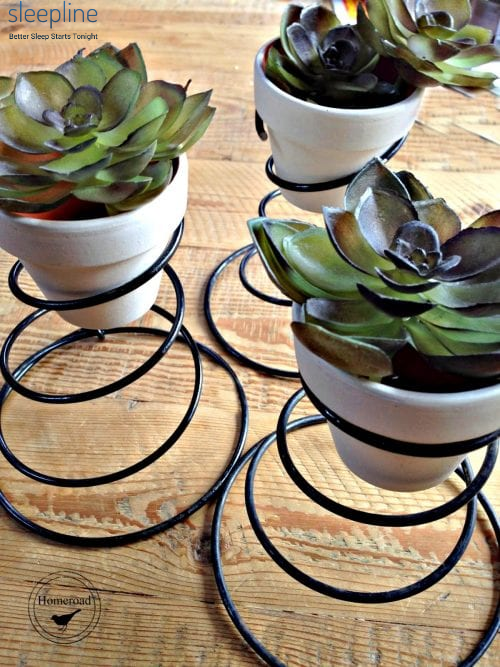
Vertical planter
Vertical planters have become really popular in recent years. Using a drill and screws, attach the entire coil spring system to a wall or a sturdy high fence. Then add plants all over it, using the inside of coils as holders.
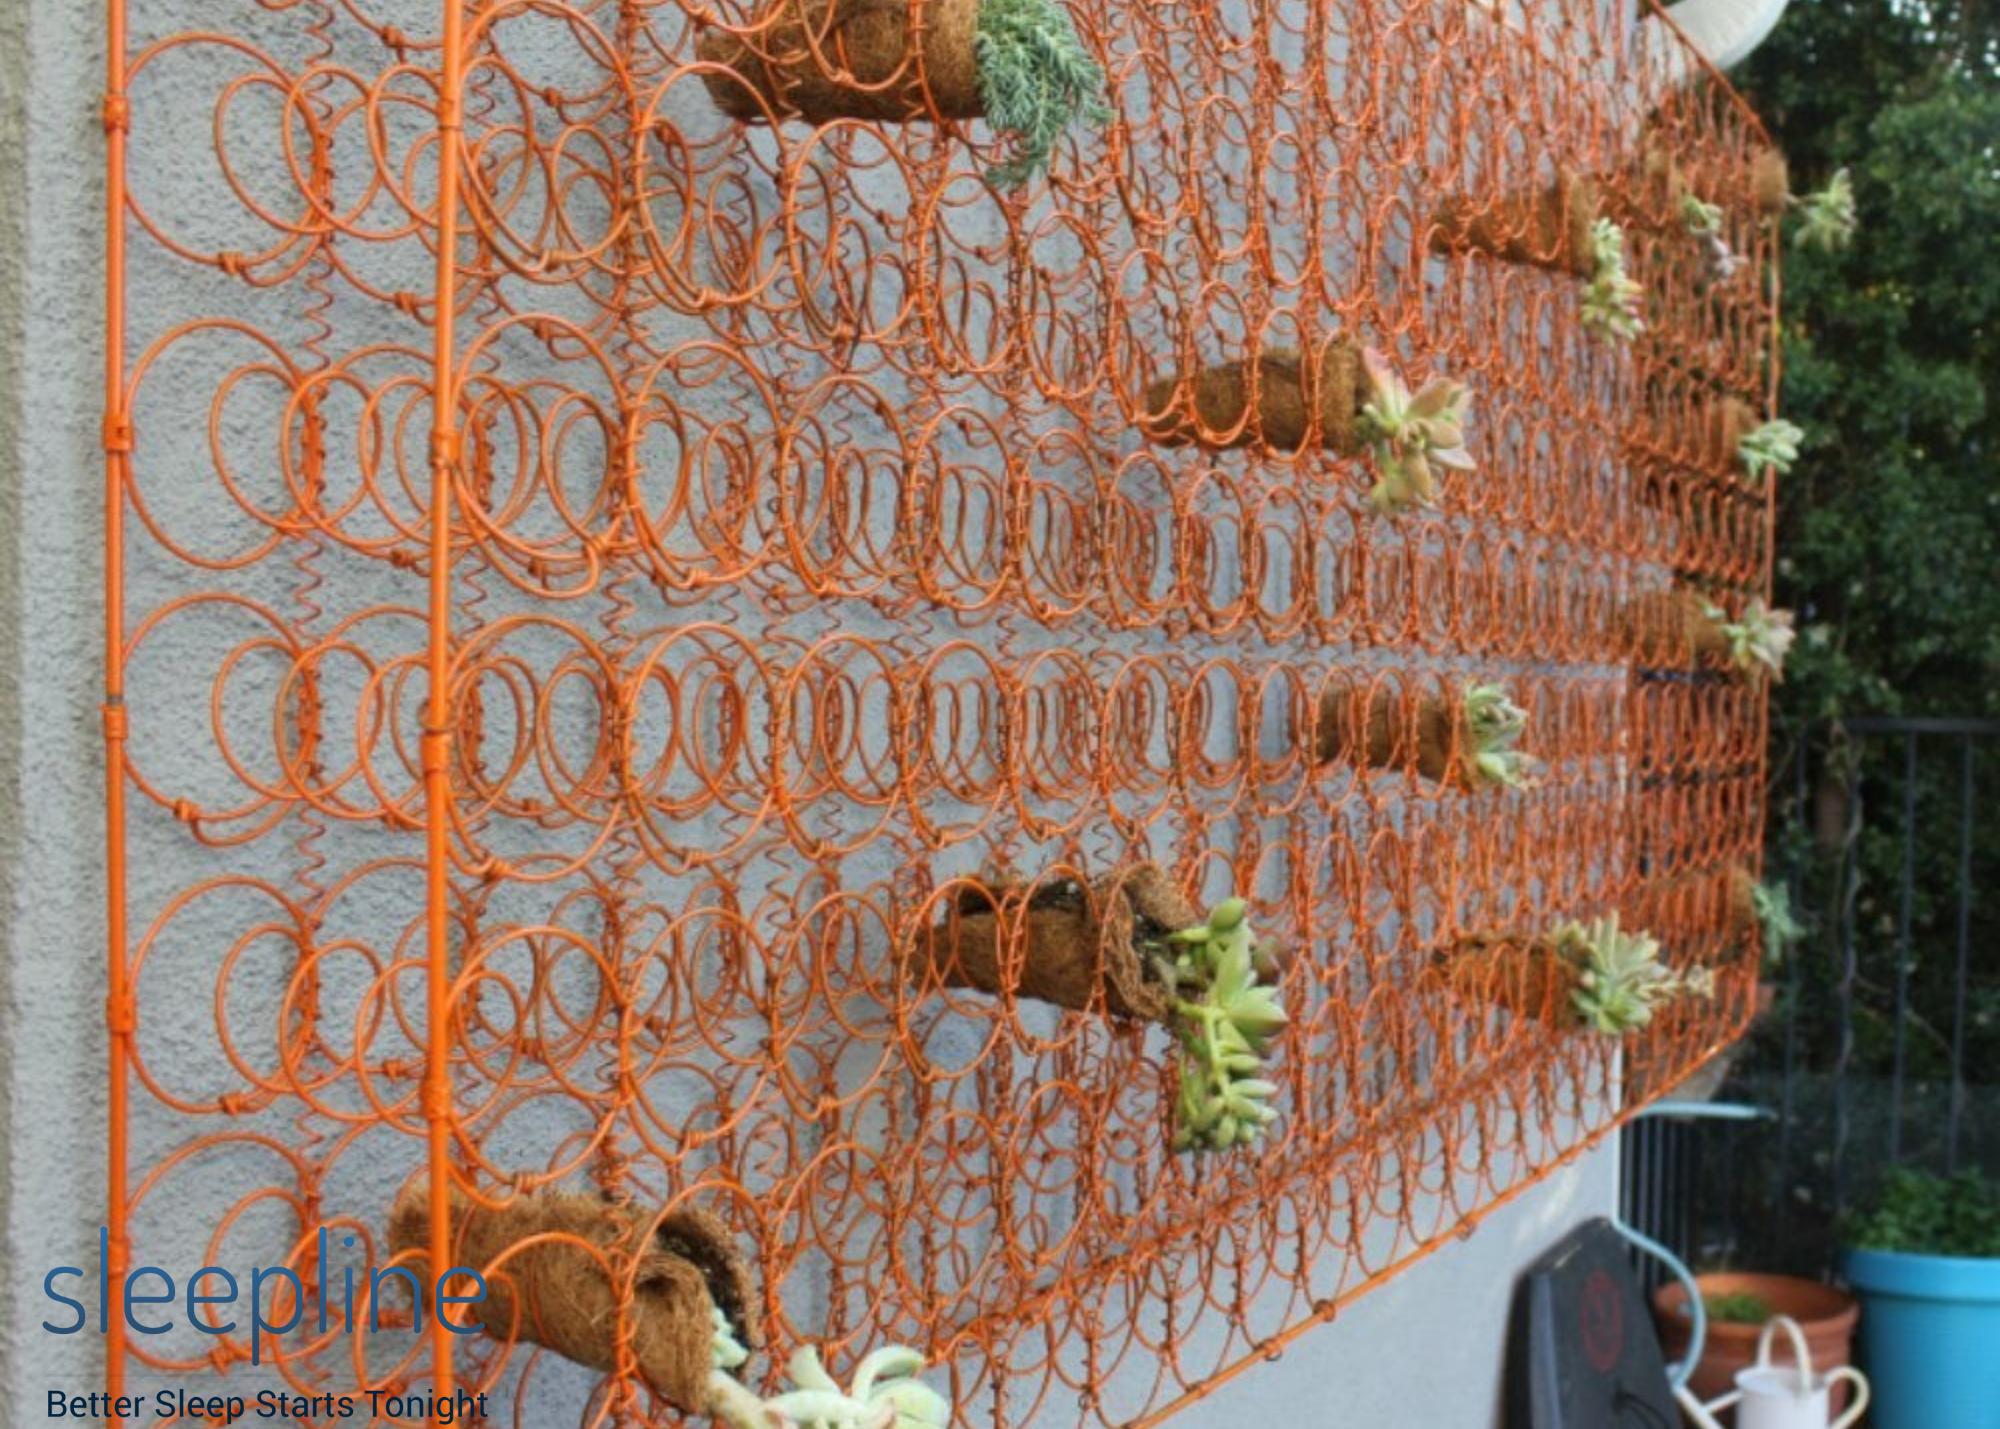
And if you have a green thumb but don’t like this particular idea, consider using the spring coils as a garden trellis. You might even put the coils on the ground and use some planks to secure that it stands upright. Once your plants grow all over it, you’ll get a small green wall that might keep you out of your neighbor’s sight.
Flower display
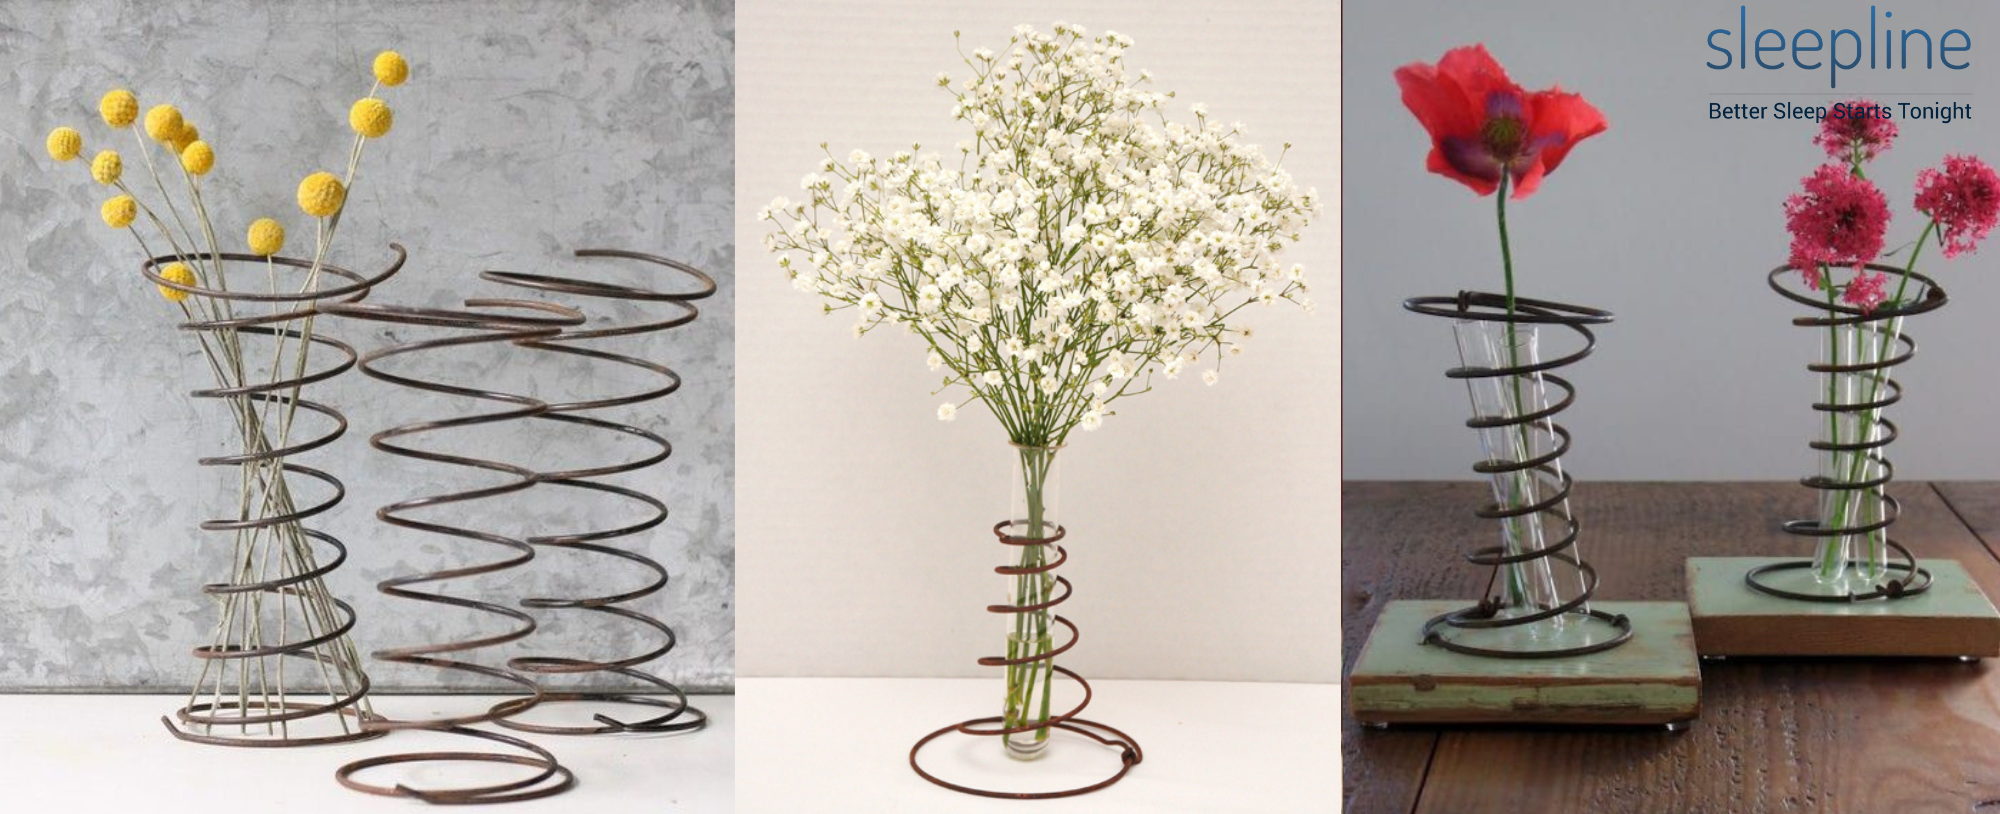
Artificial flowers, fresh flowers, flowers in tiny planters, bouquets – there are so many ways in which you could use coils to display flowers.
You might add a small wooden stand at the bottom and attach the coil to it. This will make it more stable and you’ll be able to place larger bouquets in it.
As for fresh flowers, use a tiny jar or a test tube to hold water.
Pin board
Cribs and beds for small kids are the right size for a pin board. This is one of the easiest bed spring crafts and you could do it with your kids. Just secure the whole spring frame to the wall with a drill and several screws, and start adding cards, notes, and photos. It’ll work just like a regular pin board, only instead of push pins, you’ll be using clothes pins.
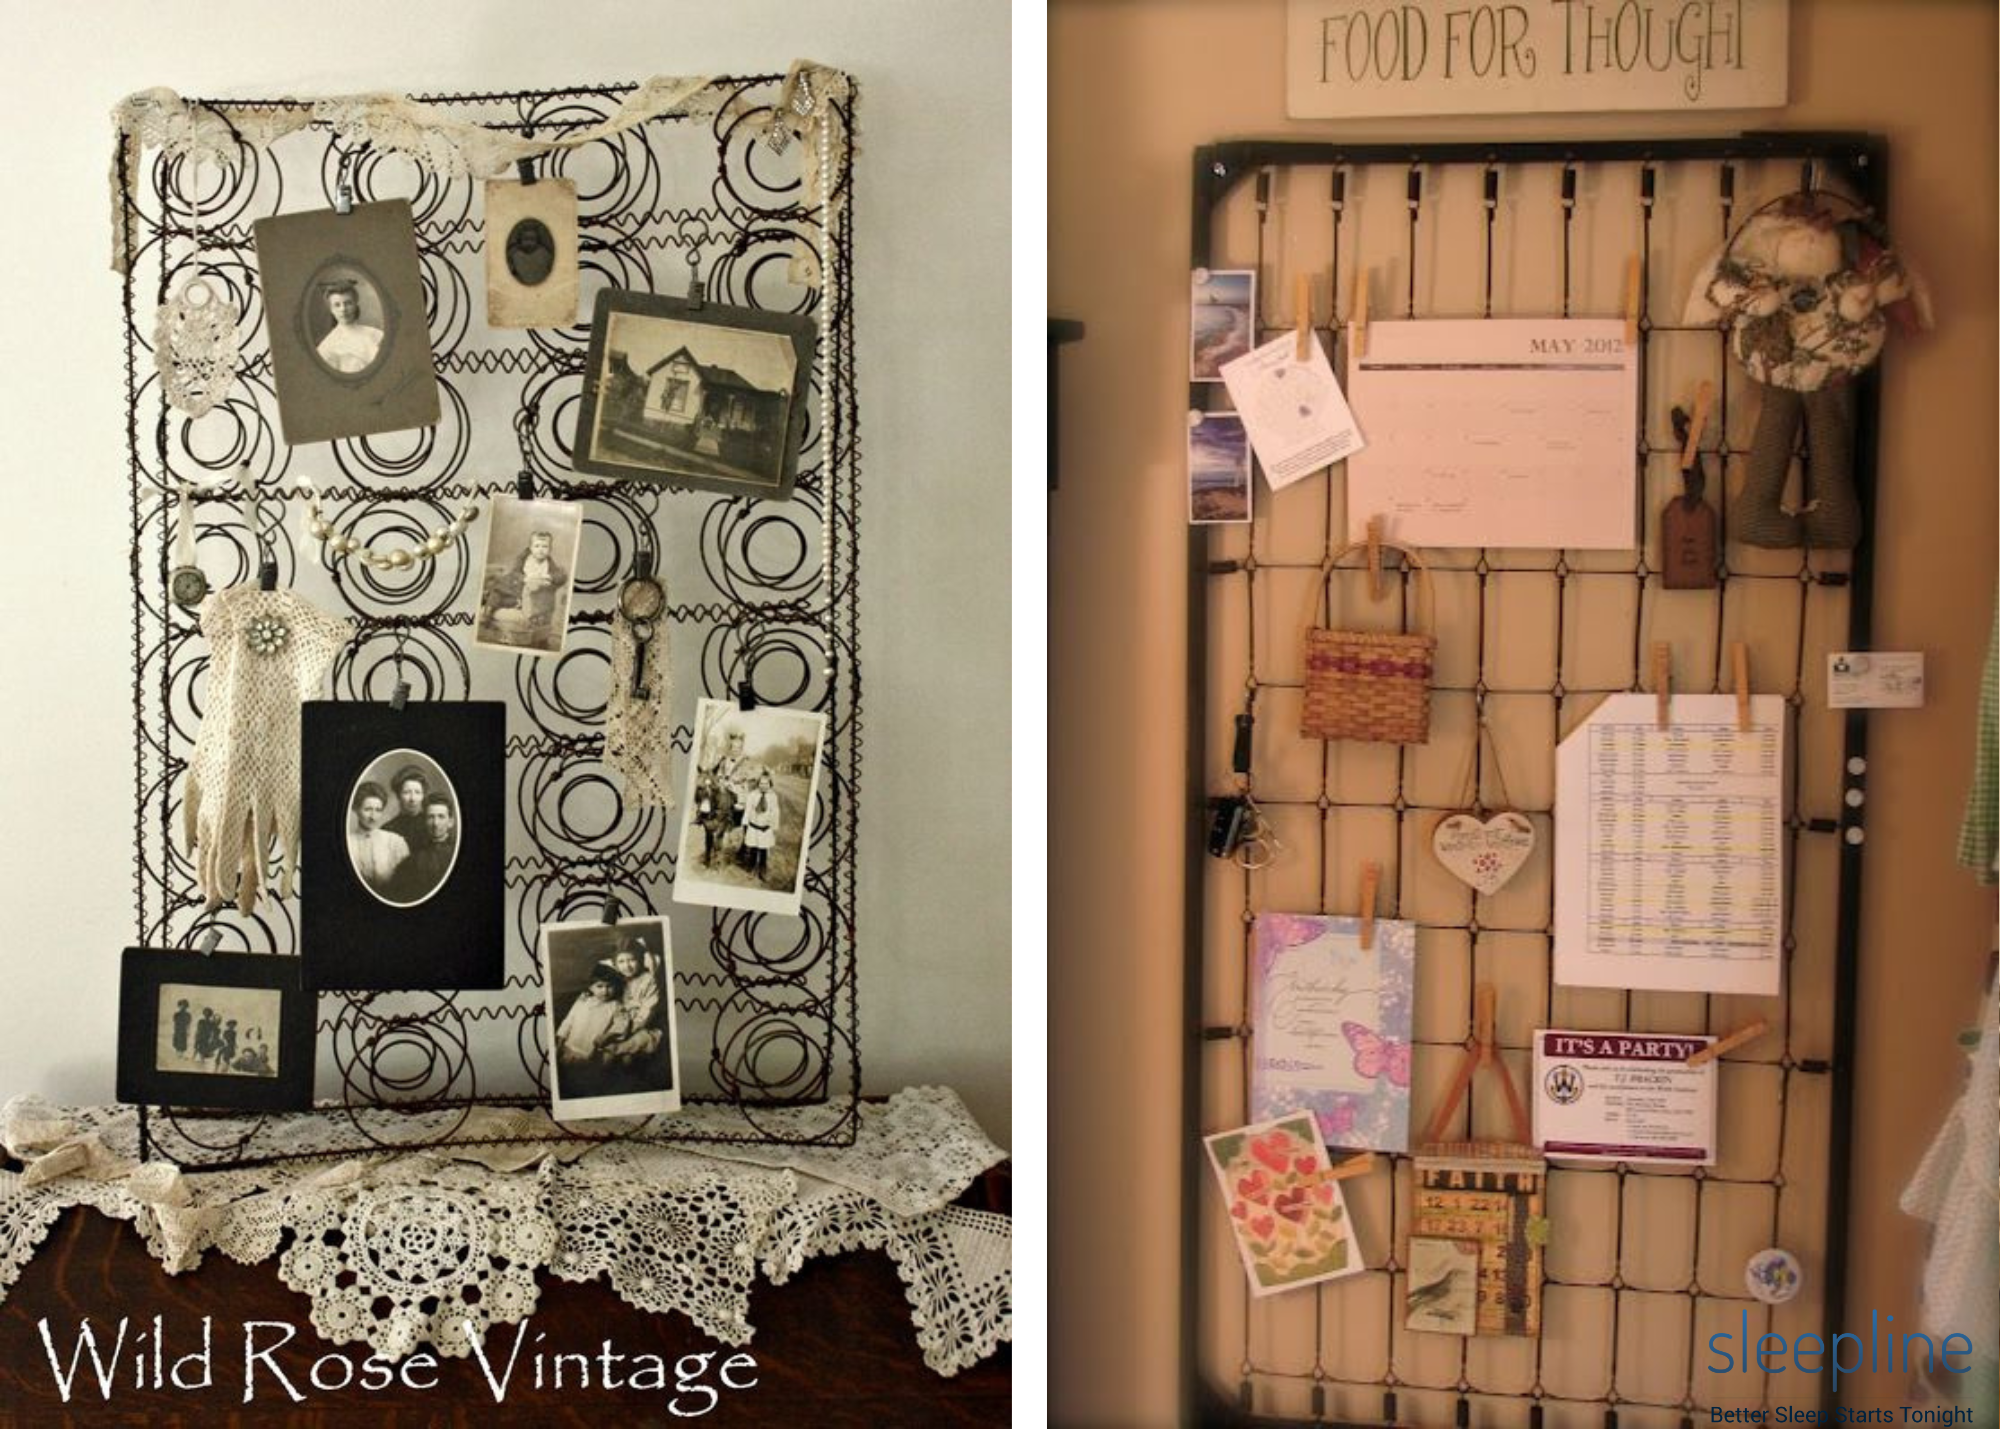
Alternatively, you don’t have to attach it to the wall. Just place it on a stand or another piece of furniture.
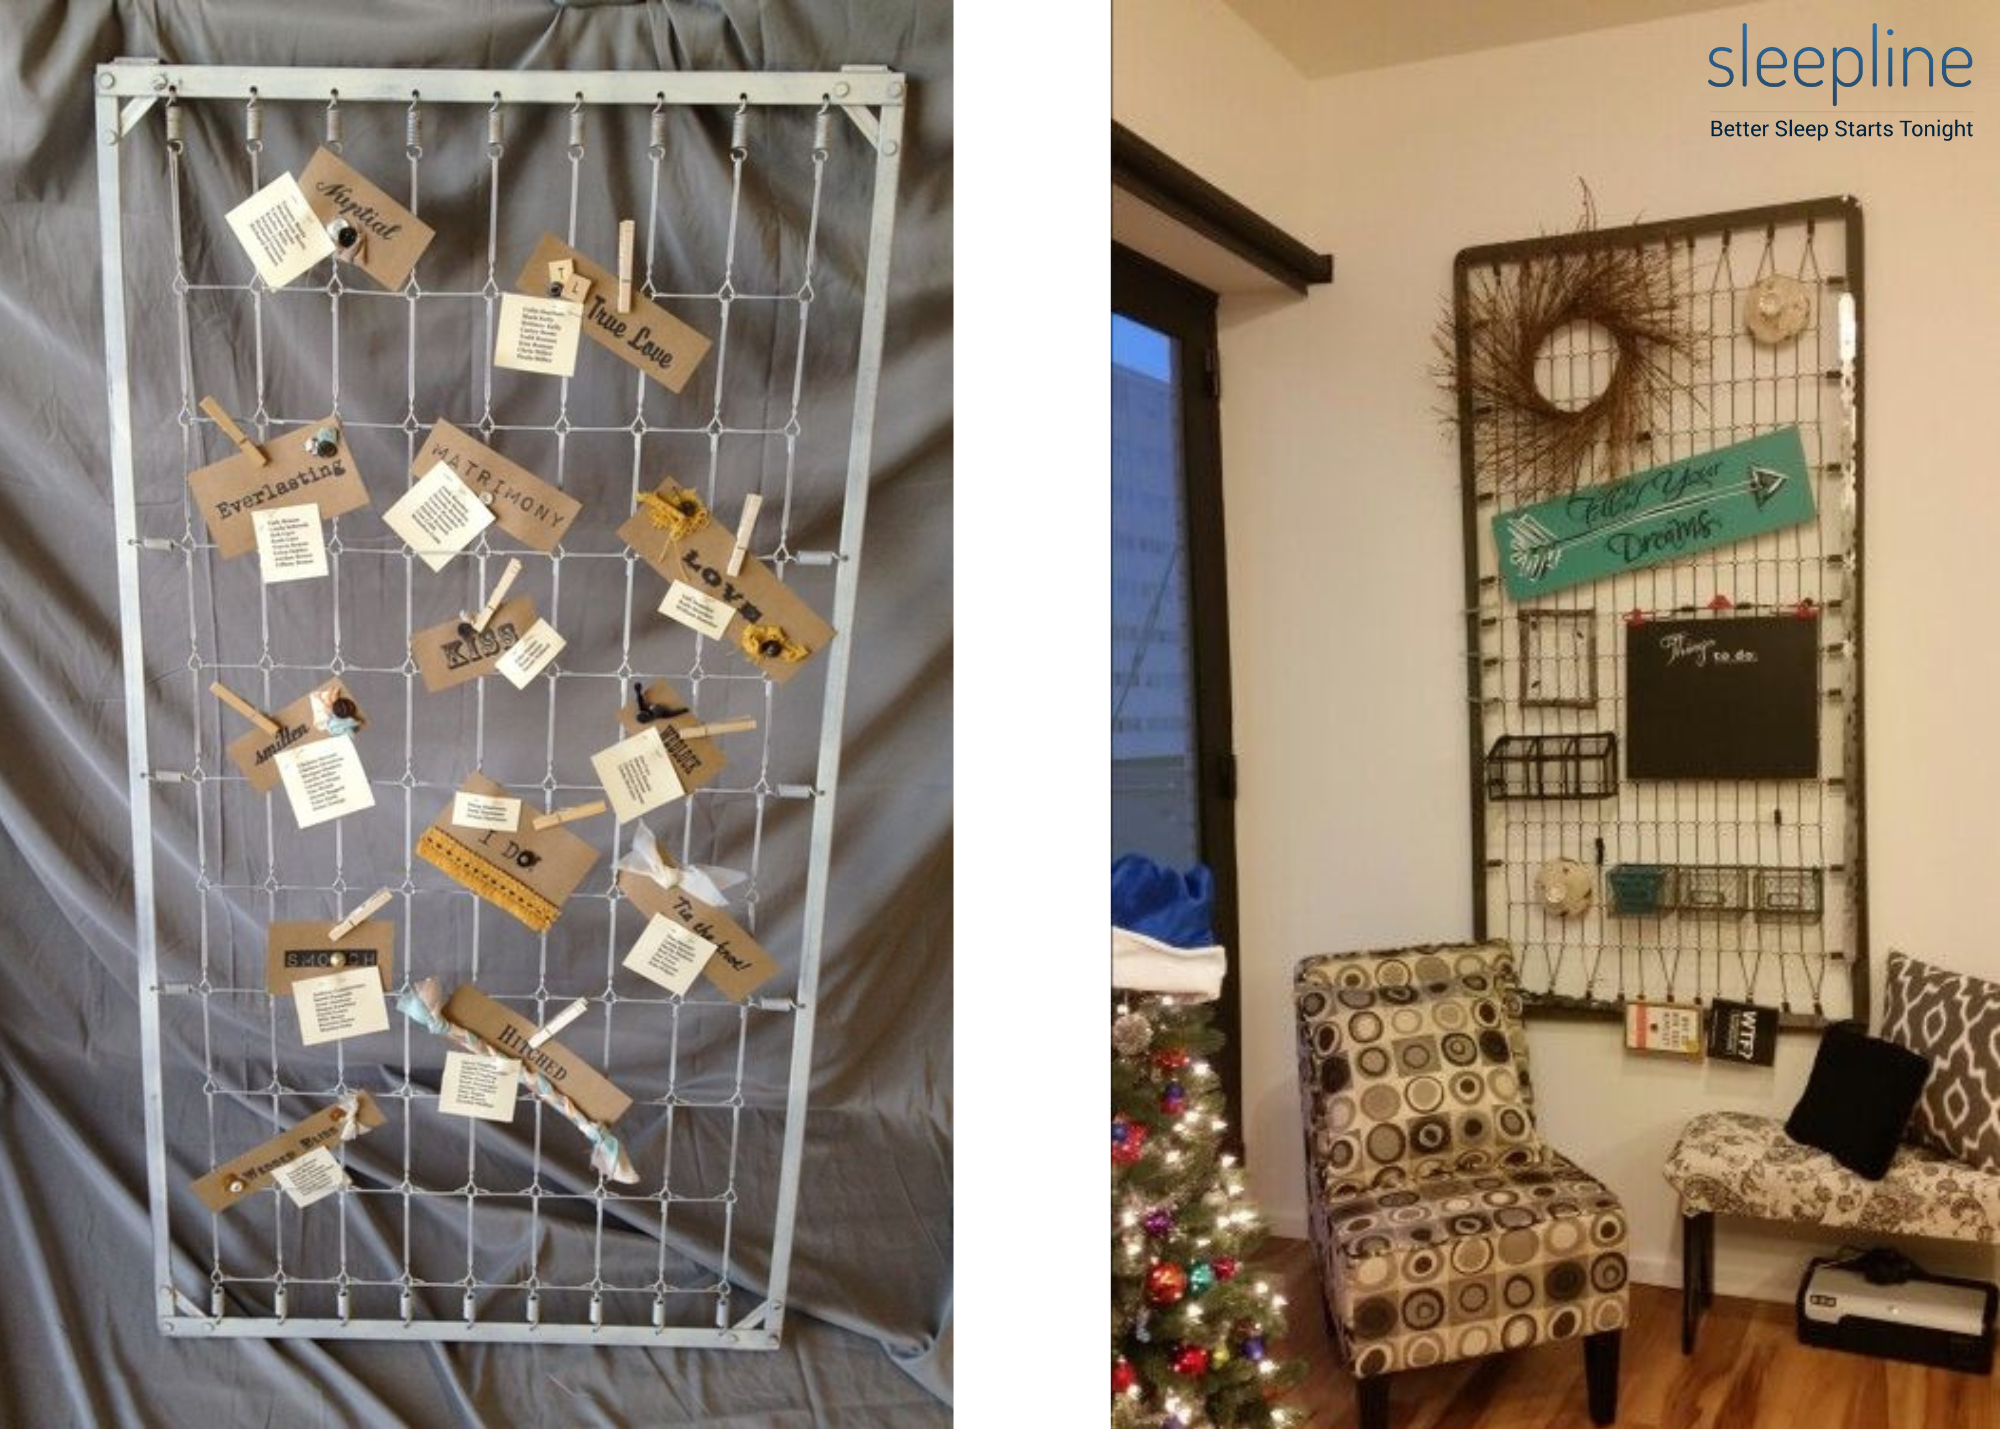
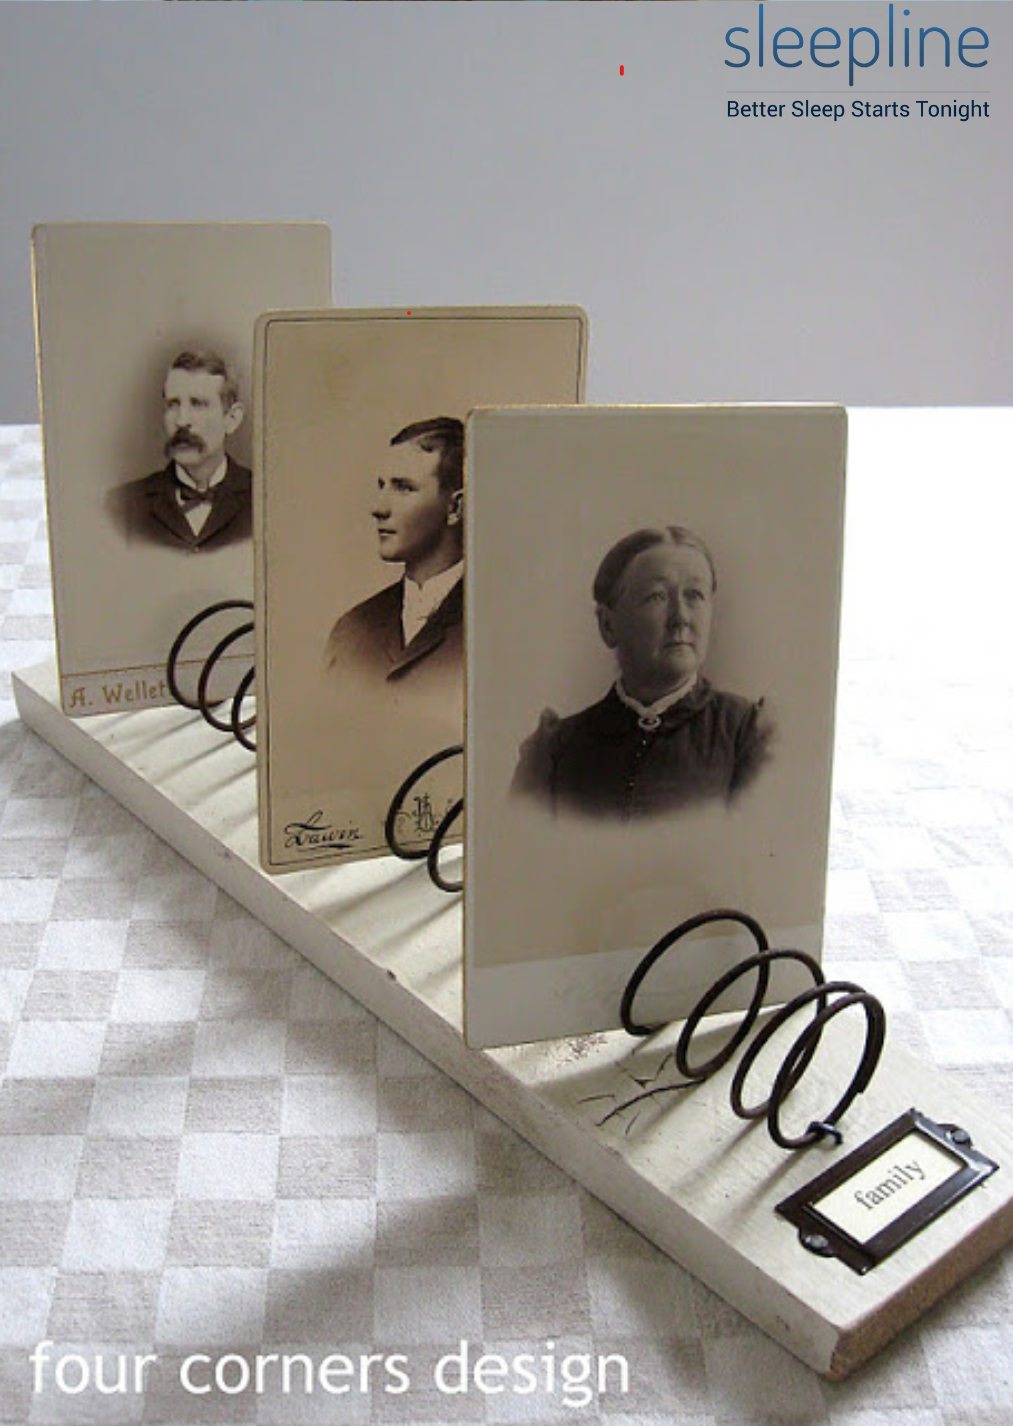
Photo display
Place the spring sideways and attach it to a small board with a staple gun. Then use the structure as a photo display. Use pictures of your family, memorable moments, or some nice scenery – whatever makes your space feel at home.
Jewelry organizer
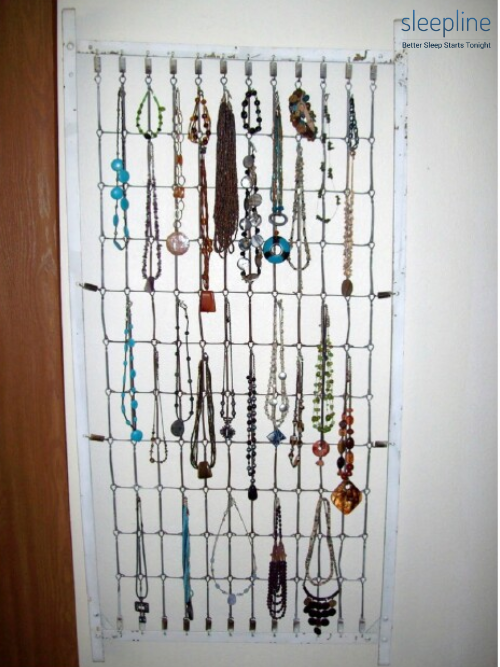
Back to small beds and cribs – use the springs as a jewelry organizer. You can hang all your jewelry there. You don’t have to exclude items that can’t be hung. Just get one of those small organizer boxes with hooks on the back, place it on the springs and you’re good to go!
Room divider
If you have some real handyman skills, you can attach the bed springs to the ceiling and add lights into each coil. This will serve as a visual room divider and works best in businesses – cafes, hair salons, studios, etc.
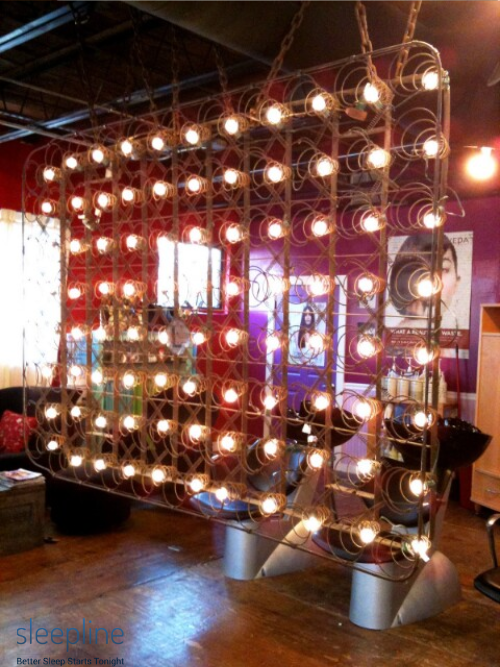
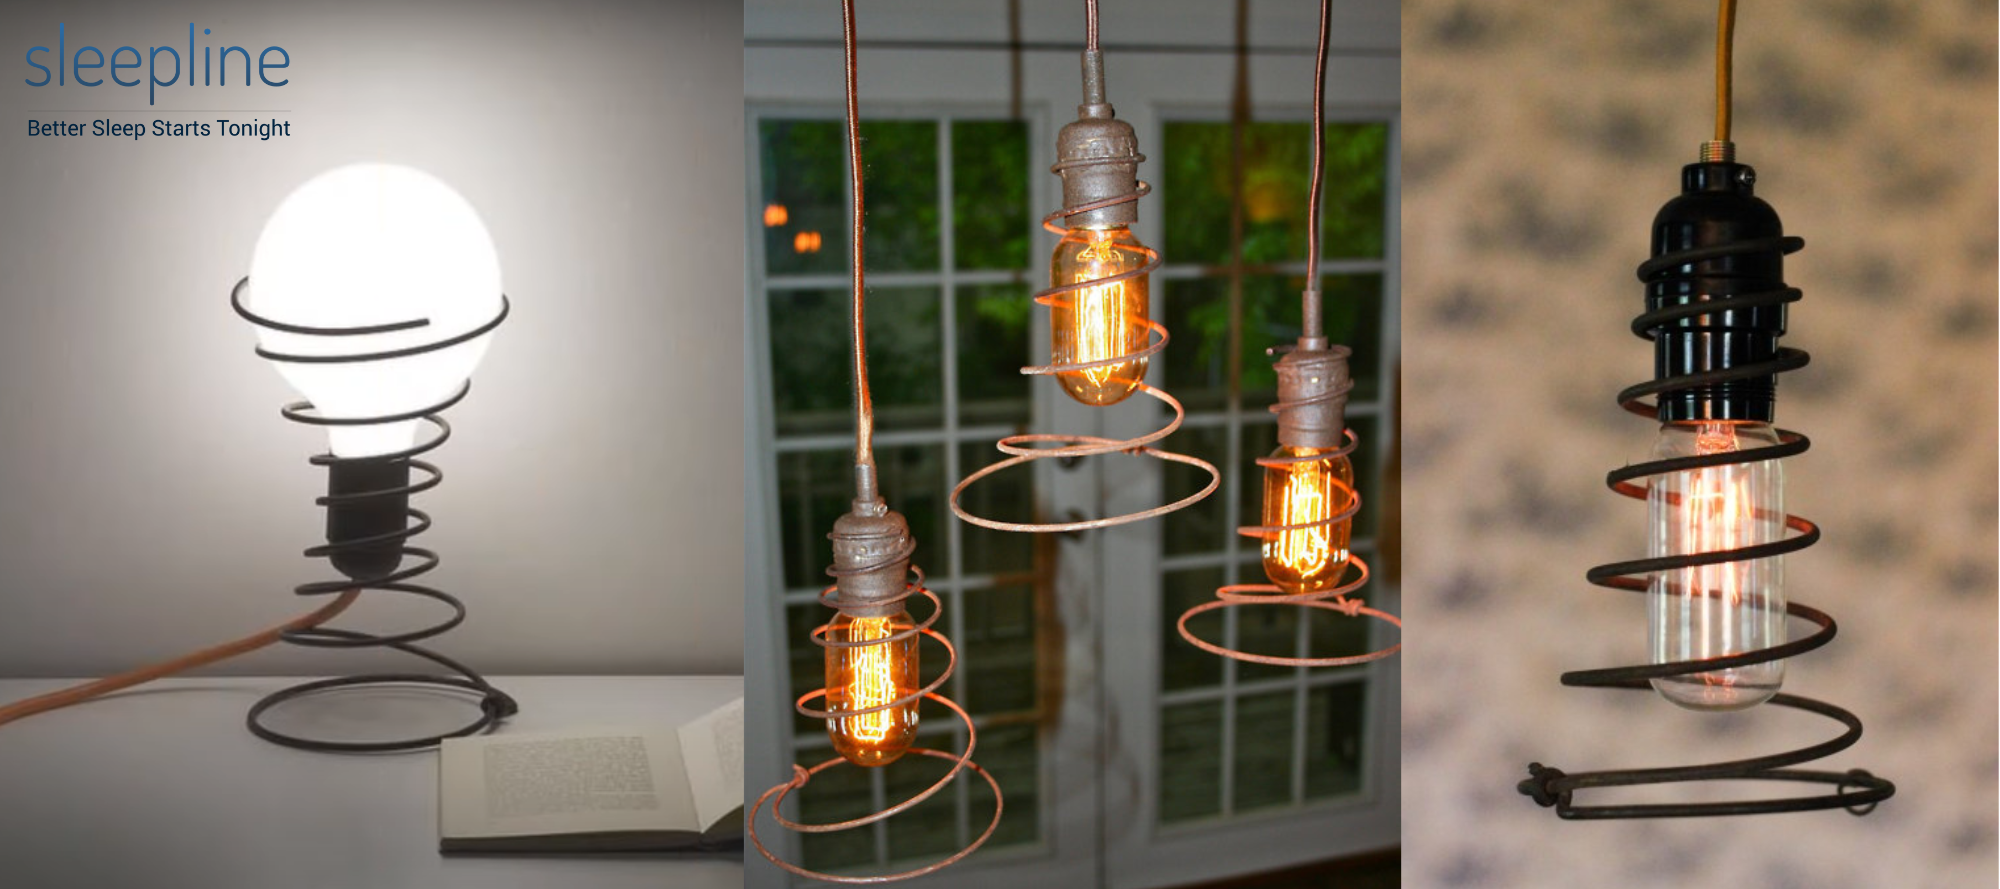
And a bonus idea for the end – put the coils around hanging light bulbs to make a nice effect or use them to hold a bulb like a lamp.
FAQs
Yes, metal does wear out after years of consistent use. Springs can get rusty, squeaky, and they can break. This depends on the spring gauge, quality of the material, the amount of weight put on the mattress, and many more factors. The average lifespan of an innerspring mattress is about 8 years, but with good care, it could live longer.
No, they can’t. If they break, that’s it. If you’re really handy, you could replace the coil springs, but that requires lots of skills and patience.
Conclusion
All mattresses don’t have springs. But for the ones that do, you can turn those old coils into TONS of cool and interesting upcycled objects.
You can make dozens of things with old bed springs; from simple home décor to creative but practical items for home or garden – various holders, organizers, and more. The best thing is that all ideas you see here can be adjusted to match your needs and taste. All you need is an old bed, some basic tools, some time on your hands and a bit of imagination.

Next step: Read our Saatva mattress review. If you’ve just upcycled springs from your old mattress, then you’re probably in the market for a new one. Saatva is by far one of the most durable and longest lasting brands we’ve ever tried. If you aren’t sure which new mattress to go with, choose Saatva.

With over 5 years experience writing about sleep and mattresses, she's considered one of the go-to experts on the topic.
She likes cycling, nature, art, and languages. She pays special attention to providing you with accurate and useful information when it comes to your sleep quality.
After solving her personal sleep and tiredness problems, she is on to help others by sharing this invaluable information.
- Where to buy Saatva mattress (online and offline) - April 26, 2025
- Latex vs memory foam mattress (which is better?) - March 12, 2025
- Bed in a box vs traditional mattress (which is better?) - February 17, 2025
Psst… the sleep review industry is full of liars, sharks, and thieves. It’s a modern-day version of getting ripped off at your local mattress store. So, why should you trust us?